Search this Blog
Sadie's Blogs and Website

For posts 2006-2010
please visit
sadievaleri.blogspot.com

Sadie’s current site is at
SadieValeriAtelier.com

UPDATE February 1, 2021

I have recently discovered that unfortunately this Squarespace blog has failed to maintain most the images for older posts on this blog. Luckily, the original Blogger version is still live at sadievaleri.blogspot.com and all the posts and images from 2006-2010 are still visible there.

For my current artwork, teaching, and blog please visit Sadie Valeri Atelier.


Entries in still life (130)

Wednesday
Nov252009

Sterling Boat: Session 7

Sterling Boat - DETAIL - work in progress
9 x 12, oil on panel

I finally got in a nice long 6-hour painting session today, and it was so exciting to finally be working in color.

It took me a while to get used to painting in color over the more fully realized grisaille (monochrome) underpainting, and after the first hour of working in color today I wiped my work away and had to begin again. But then I started getting a feel for how opaque/transparent to work and everything started to flow.

The photos actually reduces the color a bit (and darkens everything). I repainted the pedistal base of the silver pitcher in color, but in the photo it still looks monochromatic.

Once I get everything to this level of detail, Ill make a final pass with the super tiny brushes, which gives a painting the extra snap of realism. I'll probably spend another 8 sessions or so on this painting.

Now I'm off to cook the dishes I'm bringing to my mom's Thanksgiving spread tomorrow: ratatouille side dish, traditional stuffing, and cranberry sauce...

Happy Thanksgiving!

Sunday
Nov222009

Sterling Boat: Underpainting stage 6

Sterling Boat - work in progress
9 x 12, oil on panel

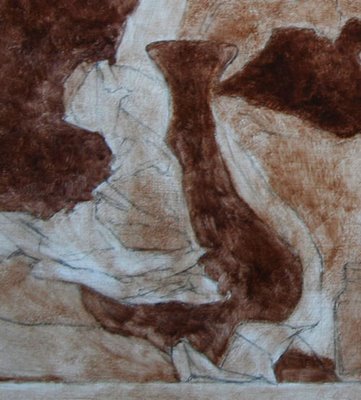
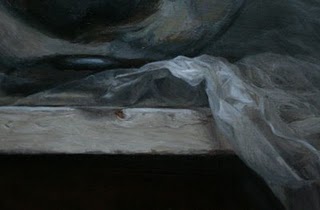
Today I worked on the wax paper, and although I refined every bit of it, from this photo you can barely see a difference from the last stage. But this level of refinement will really help when I move to the color stage. This session was a little over 4 hours.

Saturday
Nov212009

Sterling Boat: Underpainting stage 5

Sterling Boat - work in progress - DETAIL

Sterling Boat - work in progress - PREVIOUS DETAIL

Sterling Boat - work in progress - DETAIL

Sterling Boat - work in progress - PREVIOUS DETAIL

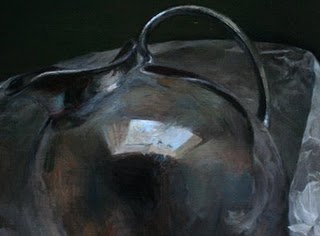
I worked today on the reflection of the seashell, and also the handle and the spout of the gravy boat.

I ended up redrawing the shape of the handle significantly. I sort of knew the drawing wasn't right when I was working in pencil, but I had wrestled with it a long time and I finally gave up. But when I started refining the paint today, it I realized I couldn't live with the errors and and ended up rethinking all the contours -- which is far more frustrating to do in paint than in pencil. But I'm glad I took the time to do it because the handle now feels more structured and believable.

The spout was much easier, because I worked and worked to get it correct in the previous pencil drawing stage, so it only took about 30 minutes to refine the painting. Which is a good thing, because with the early winter nightfall these days I am always racing to finish the day's work in last few seconds of workable light every evening.

Studio Hours
In the comments of my previous post Rahina asked how long I spend per session. I realized that's a great idea to note, so I'll start mentioning that when I post. Today I spent 4 hours painting. I rarely paint less than 4 hours in a session and I generally aim for 6.

Once I am working I don't look at email or answer the phone and barely take a break at all. But it's almost like being under water, to ignore absolutely all distractions for several hours, and so part of me resists the initial plunge. Once I'm in the studio though, I always wonder what took me so long to get there.

When I am not in the studio I am preparing lessons for my students, looking at blogs of fellow artists, planning my dream studio, writing up course descriptions, shopping for art supplies, preparing submissions to galleries or contests, shipping artwork, and, of course, blogging. I am amazed how much work there is to do for this art life, and it turns out I am the strictest boss I've ever had. But I love it all, so it doesn't feel like work.

Coming soon.....
I have some exciting studio news I'll be announcing in the next few days, so stay tuned!

Friday
Nov202009

Sterling Boat: Underpainting stage 4

Sterling Boat - work in progress - DETAIL

Painting in grayscale at this level of detail feels more to me like drawing than painting... maybe that's why I enjoy it so much.

Wednesday
Nov182009

Sterling Boat: Underpainting stage 3

Sterling Boat - work in progress
9 x 12 inches, oil on panel

I've continued to develop my underpainting. I'm always anxious to jump ahead into the color stage from here, but I am disciplining myself to stay with values for a while longer. It just makes the rest of the painting so much easier if I develop the underpainting as much as possible before moving ahead.

I'm thinking about adjusting my underpainting medium - it dries too fast, and now that I am working on my underpainting longer, I'm realizing I begin to race just to paint faster as the medium dries. It's got more thinner in it than the oily painting medium, and it pretty much sets up in a day. So after 6 hours of painting, my paint begins to get sticky - ugh.

Ecroche in Oakland, California:
There's an amazing ecroche class being offered in February 2010 by Andrew Ameral. The SF Bay Area is so lucky to have Andy, he's returned from teaching at Florence Academy for 7 years. Anyway, ecroche is building a model in clay of a flayed human figure, starting from the bones and layering up through the layers of muscle. I am so hoping to be able to take the class!


--------TEACHING-----------
I am planning my teaching schedule for 2010 so take a look at my teaching page and sign up for my mailing list to be notified when I post new classes and workshops.

Sunday
Nov152009

Sterling Boat: Underpainting stage 2

Sterling Boat - work in progress
9 x 12 inches, oil on panel

Today I worked on the grisaille stage of the underpainting, which is a value-only underpainting. The previous stage uses raw umber and ultramarine to make a neutral color grey, and uses the white of the panel for the lights. This is called an open grisaille, because the white of the panel shows through.

This second stage is a closed grisaille. I use the same raw umber and ultramarine blue for the neutral dark gray, but I also use flake white (cremnitz white) for the lights. When it is done the white of the canvas will not show at all, the surface will be covered by paint.

I used to only paint an open grisaille layer, and then go right to color. But I have found it saves me a lot of time (and anguish) in the later stages of color if I take the time to make a complete value painting in closed grisaille first. The open grisaille is just too transparent and textured to behave well as an underpainting for my needs.

I also spent some time wet sanding this layer with my underpainting medium before I began painting. This removes dust that may have embedded in the previous layer as it dried, and makes it easier to paint on the dry surface. Putting down a layer of medium to paint into is called a "couch".

--------TEACHING-----------
I am planning my teaching schedule for 2010 so take a look at my teaching page and sign up for my mailing list to be notified when I post new classes and workshops.

Friday
Nov132009

Sterling Boat: Underpainting Stage 1

Sterling Boat - work in progress
9 x 12 inches, oil on panel

I worked up the preparatory drawing for this painting a few days before I left for my trip to New York, and varnished it before I left, so when I came back to the studio today it was all dry and ready to start the under painting. Might be hard to see yet what it is - it's an antique silver gravy boat and a seashell perched beneath a 'wave' of wax paper.

I'm not videotaping this painting like I have previously, but I took photos while painting today. The first layer of under painting is just quickly roughing in all the values, I spent about 3 and a half hours today. Today is probably the only day I'll cover the entire surface in one painting session.

stage 1
The initial contour drawing took about 8 hours over 2 days. I started the basic block-in drawing on trace paper but completed the final refined linework directly on the gessoed panel. Then I varnished it with a mixture of damar, turp, and a tint of titanium white to seal the drawing and the porous gesso surface. This makes a nice surface to paint on - not too thirsty, not too slick - and also prevents the graphite pencil from mixing with my first layers of paint.


stage 2
I start the underpainting in the darkest black areas and work in steps up to the lightest lights.

stage 3

stage 4

stage 5
The painting is still rough and brushy at this stage. The paint texture is hard to control at this point, and I'm just massing in values, so I try not to spend too much time worrying about unwanted textures.

--------TEACHING-----------
I am planning my teaching schedule for 2010 so take a look at my teaching page and sign up for my mailing list to be notified when I post new classes and workshops.

Monday
Sep282009

Wrapped Silver Goblet: FINAL


Wrapped Silver Goblet
11 x 14 inches
This painting will be showing at the Open Studios Exhibition at the SomArts gallery here in San Francisco October 3- 29. Come see the exhibit at one of these two events:
Private Preview Gala, Saturday, October 3, 2009 (ticketed event)
Exhibition Opening Reception, Sunday, October 4, 2009 (free event)
More info at ArtSpan.org


I'll be teaching two workshops on still life painting in summer 2010, one here in the San Francisco Bay Area and one in Florida. Details to follow soon!


Tuesday
May122009

Bottle Collection: Overpainting II

detail in progress

It's always satisfying to bring at least a small area of the painting up to the highest degree of finish I can manage. Here are previous stages of this area of the larger painting:


I'm pretty happy with it at this stage, although for several painting sessions I was really struggling over the brightest areas of wax paper in front. It's always hardest for me to figure out how to paint an area with lots of bright highlights.


I've been thinking about highlights and why they are so difficult. They are not, as we are sometimes taught, simply the lightest areas. In fact, in order to paint convincing highlights, I find I have to paint the entire form without the highlights first. Highlights behave in a completely different way than the rest of the light. 

I think understand why: unlike other light effects, the highlights are reflections the way a mirror is a reflection. So light is not merely bouncing off the surface, but there is a depth to the highlight. It's actually hitting a different plane of vision, so we actually re-focus our eyes to see a highlight. 

Which is why it is so hard to paint highlights: we are trying to capture a stereoscopic effect. Our eyes can perceive depth in real life, but a painting is merely the illusion of depth. 

Thursday
Mar262009

Wrapped Pitcher: FINAL - SOLD

6 x 8 inches, oil on panel (SOLD)

It was really nice to focus on a small painting! Had a lot of fun with this, did it in about 8 half-day sessions in under 2 weeks. I didn't include a shot of every day of work... the last few days the changes are important, but are barely visible in a photograph.

Here are the stages:

Underpainting
Transparent paint, no white, pencil drawing still visible.

Opaque painting stage 1
Blocked in the major values with opaque paint -still thin, using underpainting medium.

Overpainting stage 2
The whole panel has at least one layer of overpainting, and I'm starting to refine the details in the upper right edge of wax paper. Using real medium now.


Overpainting stage 3
I decided all my shadows within the wax paper were too dark, so I lightened all the wax paper.

Final

Went back into the wax paper and refined all the details. I wanted to get an accurately wide spread of values within the wax paper but also show that the overall range of values in the wax paper is very light. Finding the steps between the brightest highlights and the next step down is always the hardest. Making the darks distinct from the lights, but not too dark, is always hard, too.

This painting and all others listed under "available work" are for sale. Please email me for a price list.

If you haven't yet, come on over and check out my new blog, Women Painting Women, it's a great collection of 59 amazing artists and counting!

Tuesday
Mar172009

Wrapped Pitcher: Underpainting

6 x 8 inches oil on panel

It's probably hard to see what the subject is at this early stage of under painting messiness, but it's my favorite little pewter pitcher wrapped up in wax paper.

I'm trying an experiment, so see if I can work on a series of small paintings while I also work on a large painting. My plan is to work most the day on the Big Painting, but reserve an hour or two to work on the smaller project, hopefully one that I can finish in a week.

I'm usually completely focused on one painting at a time, which I like because I go to bed thinking about it and wake up knowing what I'm going to start in the studio instead of dithering about What To Do. But at my current rate of output it will take me forever to get to my goal of 30 portfolio-standard pieces. So I'm hoping I can speed up and start cranking out more than one painting every month or two.

On another note, I've started a new blog devoted to contemporary Women Painting Women. If you have any suggestions for work to include there please email me! sadiej[at]gmail.com

Wednesday
Feb042009

Silver Globe Pitcher: FINAL


oil on panel
16 x 20 inches
Award: Oil Painters of America 2009 Western Regional Juried Show


I made a video slide show showing all the stages of the painting and some detail closeups. You can see the movie for this painting here.


More about this painting:
In 2008 I began a series of still life paintings using crumpled wax paper as my subject. I was drawn to the material because I can twist, and crush the wax paper into draped and spiraling shapes to create dynamic environments for the simple, antique bottles and pitchers I collect.

I am always on the lookout for interesting vessels to paint, and when I found a spherical silver water pitcher at a flea market, I instantly fell in love.

Certain objects call to me and must be painted. I have learned that collecting something not-quite-right, just because I "might use it someday" is rarely successful. Those objects languish on my shelf for years, always passed over. The objects I paint resonate with me deeply and demand to be painted immediately. I had a vision of the silver globe pitcher draped in a "shawl" of crumpled wax paper, with the shawl arranged as if a small breeze were filling and lifting it.

When I set up a new still life I spend several studio days crumpling paper and discarding it, moving objects around, trying to find the best shape and composition through my viewfinder. The wax paper takes gentle coaxing and twisting to arrange it in with the feeling I am envisioning.

The final arrangement must look fresh and transparent, like it just landed there, no matter how many discarded pieces it took to reach my vision.

I begin all my paintings with a detailed contour drawing in graphite pencil on wooden panel I have prepared myself with homemade gesso. I spend several days on the drawing, first on trace paper and then directly on the board. I find that if I spend the time needed on the drawing, the structure and believability of the final painting is more successful. I never rush the drawing process, even when I am anxious to begin painting.

Once the drawing is finished, I paint in many layers over the course of a month or more, first in grays, called a "grisaille", to establish values, and later in color. I use tiny brushes from start to finish, and work on a small area each day. I move slowly around the painting, bringing each section up to the highest degree of finish possible before moving to the next area. Silver Globe Pitcher took me over 120 hours to complete over the course of 2 months.

It is only the latest stages of my process where I get to enjoy the beautiful and most subtle effects of light and texture on the surface of the objects, like the turquoise tarnished area at the base of the pitcher, the transparent paper melting into the background, the pedestal of the pitcher peeking through the folds of paper. But it requires all the earlier stages of building a solid drawing and value structure in order to successfully render the beauty I see in the surface details.

Silver Globe Pitcher is a rare instance where I include a self-portrait in my painting. I wanted the self-portrait to be a discovery, so the viewer sees and appreciates the whole composition first, before noticing my tiny image reflected in the vase. That way, each viewer has a sense of having discovered something on their own, a small secret in the painting.

My self-portrait embedded in the painting allows each person to discover my own image peering back. The viewer can see the entire little studio where I worked on this painting, and have a sense of being able to get a glimpse into the experience of the painter.

See the previous blog post about this painting here.


Tuesday
Jan272009

Silver Globe Pitcher: Overpainting Stage 5


All of today's painting session was spent refining this area of the wax paper. I'm really enjoying all the transparent folds.

See the previous blog post about this painting here.

Tuesday
Jan272009

Silver Globe Pitcher: Overpainting Stage 4

16 x 20, oil on panel (detail)

I had a lot of fun with this left section of the the wax paper. The big chunky flap of paper in front was a huge lesson in remembering not to have "tunnel vision", remembering to compare the local value range to the entire painting. This area has a huge amount of information all within a few very short steps of value, so I had to be careful not to be tempted to exaggerate. Then the highlights are in another value stratosphere, making it all even more complicated!

I am thrilled to report that my recent video painting demo got a wonderful (embarrassingly wonderful) writeup on the blog Art Studio Secrets. In addition to the very nice things written, I am also flattered because the other artists profiled on this new blog are artists whom I have long admired: Alex Kanevsky, Carol Marine, David Kassan, and Paul Seaton.

See the previous blog post about this painting here.

Tuesday
Jan202009

Silver Globe Pitcher: Overpainting Stage 3

(detail)

Here's a sneak peek at my little self-portrait in the silver globe pitcher.

I thought I wouldn't get much done today with so much juicy politics to watch, but Obama's Inauguration speech this morning (9am my time) was so energizing that when it was over I was too jumpy to watch more on TV, and I was out in the studio painting all day. I did listen to live NPR dissection of the day's events all day.

I've been reading the book "Flow", which is all about how optimum human experience occurs when we focus on challenging work, so I particularly liked this part of the President's speech:

"...there is nothing so satisfying to the spirit, so defining of our character, than giving our all to a difficult task."

Who can disagree with that?

See the previous blog post about this painting here.

Friday
Jan162009

Silver Globe Pitcher: Overpainting Stage 2

Detail of work in progress

Detail of work in progress, previous stage

The handle and spout of the silver pitcher has been giving me some frustration, there's a lot of very close, dark colors, punctuated by very bright highlights. Everything depends on very accurate drawing at these stages, the slightest wavering of paint strokes makes for a wobbly pitcher handle. After much wrestling, I'm feeling like I'm closing in on it, though.

I've also been struggling with the swatch of wax paper that runs behind the pitcher. The crinkles up in the right corner catch the light and jumps out quite a bit, but if I paint them with too much contrast they look a) too eye-catching and b) dumb. It's been a lot of push and pull to get it to this stage.

For some reason the bottom pedestal of the pitcher I worked on last week was a breeze in comparison to these areas, even with all that semi-transparent wax paper overlapping the pedestal.

All these photographs are reducing the color saturation compared to the actual painting. My paintings are of course very monochromatic, but I use a full range of hues to mix my neutral colors, and in person you can see a lot more range of hues within the values. For the final photo I'll work harder to get a very accurate photo.

Mediums:
I still like working with the tubed Maroger quite a lot, but it has a tendency to dry fairly matte in the dark areas. So I'm going back to the linseed-based medium for the darks, especially the background. I'm sticking with the Maroger for the light areas.

See the previous blog post about this painting here.

Friday
Jan092009

Silver Globe Pitcher: Overpainting Stage 1

Globe Pitcher, overpainting stage 1
oil on panel
16 x 20 inches
(work in progress)


The going is slow but I'm finally in the zone on this painting and starting to really enjoy it.

I'm experimenting with different mediums - my normal one based in linseed, a new one based on poppyseed oil, and a very nice big tube of Maroger medium my father gave me for Christmas. I didn't know your could buy it in tubes, I thought you had to make it yourself and it sounded complicated. So far I like the tubed stuff, it's a stiff golden brown gel that mysteriously liquifies and turns clear when mixed into the paint. I'm curious to see what it's like after it dries a bit. The poppyseed oil based medium dries too slow, completely wet even days later.

I've started looking for a studio to rent so I can have enough space to paint and draw a model. I'm looking for a north light studio with about 400 square feet here in San Francisco.

See the previous blog post about this painting here.

Sunday
Nov232008

Silver Globe Pitcher: Contour Drawing

Contour drawing for Globe Pitcher
pencil on (wrinkled) trace paper

16 x 20 inches


After completing my small 8-inch value sketch, I began a full-size contour drawing of my subject at the actual size I will paint it. And I immediately ran into a problem. The proportions of my small drawing were not exactly the same as my 16 x 20 inch panel. And also, the composition I had sketched small, once blown up would require me to paint the pitcher huge, larger than it is in real life.

So even though the composition looked nice in the sketch, the larger scale made it look overwhelming, way too big. There's a lesson in here.

It's a change for me to paint this big. The previous paintings in this "Wax Paper" series are 11 x 14 inches and 12 x 12 inches. So 16 x 20 is a HUGE leap. It may not sound much bigger, but to me it's enormous. This is the problem with blogs... there's no sense of scale.

You'll also notice the left side of the crumpled wax paper has a new shape. I decided it looked better if it angled up at the left, instead of tapering down and to a point, running off the left into infinity.... So I crumpled up the wax paper on one side (gently) and altered the composition.

contour drawing phase 1

contour drawing phase 2

contour drawing phase 3

contour drawing phase 4

contour drawing final

I've drawn the final version on trace paper so I can transfer to the gessoed panel. I usually draw directly on the panel, but since I labored so hard to gesso them so perfectly, I was afraid of dinging or marring the perfect surface with a lot of erasing. So I nearly finalized the contour drawing on paper before transferring it.

As an final note, I'd love to draw your attention to this hi-LAR-ious blog entry by an abstract painter who says, in part:

"...what’s so hard about painting a realist painting nowadays, when even a no-talent can transfer images and paint textures straight from a computer to a canvas?"

To which I nearly choked, as you can imagine. Laurie Fendrich, I sure hope you find my link to your two posts on the superiority of abstract painting to realist painting, so you take a good look at my blog here and see that realist painting takes quite a bit of study and work, even "nowadays".

Post # 1 in which Ms. Fendrich describes her irritation at having been "duped" to admire the "abstract" work of a 3 year old

Post # 2 in which Ms. Fendrich has to respond to the tempest of comments she recieved on her first dip into the abstraction-versus-realism fire pit

Oh, and especially note the parts about how the Old Masters used optical devices, implication being that anyone with a lens and a grid could have produced the masterworks of art history.

Le sigh....

----

See the previous blog post about this painting here.

Sunday
Nov232008

Silver Globe Pitcher: Value Sketch

value sketch for Globe Pitcher
graphite pencil on paper
about 6 x 8 inches

I am working on drawings to prepare my next painting. It will be much larger than my previous paintings, so I am trying to plan out the composition and values before I start. I started by spending some time on this small value sketch. It helped my visualize a feeling for the final painting.

I find my paintings work best if I spend time at the beginning imagining the finished piece as clearly as possible. I try to imagine the feeling it will have. I love the feeling of calm, cool overhead light resting on eye-level objects. I want the painting to feel like you are really seeing them and feeling the quiet.

The sketch only approximates this, but it helps me crystallize the feeling in my own mind.


sketch phase 1

sketch phase 2

sketch phase 3

sketch phase 4


sketch phase 5

sketch final

Friday
Aug292008

VIDEO DEMO: Wax Paper and Ribbon