Search this Blog
Sadie's Blogs and Website

For posts 2006-2010
please visit
sadievaleri.blogspot.com

Sadie’s current site is at
SadieValeriAtelier.com

UPDATE February 1, 2021

I have recently discovered that unfortunately this Squarespace blog has failed to maintain most the images for older posts on this blog. Luckily, the original Blogger version is still live at sadievaleri.blogspot.com and all the posts and images from 2006-2010 are still visible there.

For my current artwork, teaching, and blog please visit Sadie Valeri Atelier.


Entries in Ted Seth Jacobs (14)

Sunday
Feb242008

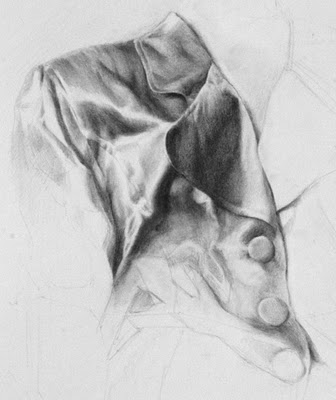
Ted Seth Jacobs - Drapery Study

Drapery Study I
graphite on paper
18 x 24 inches (detail)

Drapery Study II
graphite on paper
18 x 24 inches (detail)

I've just finished 12 weeks studying drawing with Ted Seth Jacobs at BACAA. We spent the final week modeling a satin jacket which was put on a mannequin. It was an amazingly difficult final project, it really felt like a test of everything Ted has been teaching us about how to analyze three dimensional form.

These are the 4 main principles Ted taught us to apply when analyzing form:

Convex Form
Everything in nature is curved, nothing is flat. All of these curves are convex, there are no concavities. If you look closely at a seemingly-concave drape or indentation, you can always see small convexities along it. This is evidence of the underlying structure. (It sounds implausible, everyone doubts it when they first hear it, but try seeing it, it's there).

Wide to Narrow
Nothing in nature is parallel, every shape starts wide on one end and gets narrow on the other. A shadow shape will always be a fan, not a square or rectangle. Use this concept to "shape the light".

Rounding and Ending
Every shadow rounds over a curved surface and ends before the next form begins. This means every form shadow has a soft edge and a hard edge. Think about the direction of the light - generally the edge of a shadow closer to the light source will be soft, and the edge away from the light will be hard.

What's in Front
The only point on an object not foreshortened is the point directly in front of your eye, everything else is foreshortened. That means every form is in front of or behind another. There are thousands of tiny "horizons", the edge of a shape we look across to see the next shape.

The hardest part is that all of these principles apply to every form. A rounding-and-ending shadow has a wide-to-narrow shape and it always describes a convex form which is in front or behind something else.

Saturday
Feb162008

TSJ Portrait Workshop: Bridgette

Bridgette
18 x 24 inches
graphite pencil and white chalk pencil on toned paper
about 20 hours

I experimented with a new technique with the white chalk. Unfortunately, what Ted is teaching requires so much modeling, I don't think it works well with the chalk, which gets ground in and over-manipulated in trying to get very fine detail.

Besides all that, I am happy with the drawing, especially how it compares to my first portrait of Bridgette I did 9 months ago. I feel like in this new drawing there is more a sense of the dimensional feel of the landscape of her skin. When I am drawing now I feel like my pencil is actually touching the surface of the form, like sculpting. Previously I only thought about copying lights and darks, so this is a totally different approach for me.

I do think a combination of the two is best. I first have to "flatten" my vision and record the major proportions without thinking of them as three-dimensional, in order to get the proportions right. But when the major proportions are set, there is a sense of switching to a different mode, thinking in 3 dimensions, and looking very closely at the surface, watching how it undulates towards and away from the light, and towards and away from the picture plane.

I think if you look at my first drawing, you'll see that there is no sense of being able to touch the surface of Bridgett's skin, it's just flat blankness.

I have no idea how anyone ever did or does portrait commissions from life. The pressure to achieve likeness in as short a time as possible must be tremendous.

Saturday
Feb092008

TSJ Portrait Workshop: Melissa

Melissa
18 x 24 inches
pencil on paper
about 30 hours

Despite some problems with the drawing, this is probably the best likeness I have ever done. I may have made Melissa look slightly more gaunt and maybe slightly older than she is, but the proportions and placements I feel are pretty reminiscent of her as a specific person.

I feel like Ted's lessons are really starting to sink in, and my drawing is much improved since I started working with him. He's taught me to think of the 3-dimensional forms of what I am looking at (and subforms, and subforms and subforms...), and to try to understand everything in 3 dimensions, instead of just "copying" a pattern of lights and darks. The result is a much more solidly volumetric drawing.

Next week we will be drawing Bridgett, whom I first drew last year, and I can't wait to compare the drawings and see what I have learned.

I've also started experimenting with softer (darker) pencils. I usually use hard pencils, 2H and H, and just gently go over and over to build up the tone. But for this drawing I tried using a combination of 3B and H pencils. I really liked the effect, much larger range of value.

A weird effect is happening in my eyes recently. I am looking very closely at the model, and I guess I am really staring for quite a long time, because sometimes when I look at my paper to draw I am momentarily blinded. Instead of my paper and my drawing, I see the after-effect of the model's image burned into my retinas. It's very disconcerting.

Aside from classwork, this is a sneak preview of what I am working on in my studio right now:

Saturday
Feb092008

TSJ Portrait Workshop: Melissa's Profile

Melissa's Profile
18 x 24 inches
graphite pencil on paper
about 20 hours

This is the drawing I did the third week of Ted Seth Jacob's portrait drawing class. This doesn't actually look much like Melissa.

Saturday
Feb092008

TSJ Portrait Workshop: Mona

Mona
18 x 24 inches
graphite pencil on paper
about 40 hours


My second Ted Seth Jacob workshop just finished it's 4th week (of 6) and I thought I would post what I have been working on. This drawing of Mona was from the first 2 weeks of the class.

Most of the students in this workshop were also in last November/December workshop, so Ted is showing us how the principles he taught us for figure drawing apply to portraiture.

I have to say, portraiture is very very hard. Struggling to get a likeness had reduced me nearly to tears more than once these last few weeks.

Ted always says "you must allow yourself to relax and be open and receive all the information coming into your eyes." I really agree, because I'm finding that forcibly trying to spear a likeness instead just chases it away.

Something about the human face makes us even more critical I think. The ability to recognize a face is hard-wired into our brains, and so we all have a highly developed ability to distinguish faces from one another by minute differences. But seeing the inaccuracies and being able to fix them are not the same thing.

Sunday
Dec092007

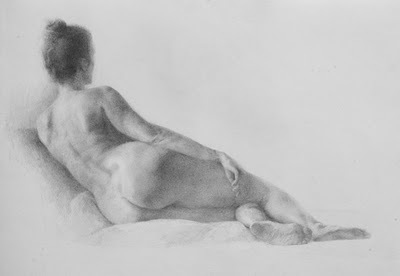
TSJ Workshop: Reclining Nude II


pencil on paper, 18 x 24 inches


I have now worked on this drawing for 2 weeks, or 10 sessions. See the earlier version here.


I have one more week left, so I have to decide what to do. Do I continue to modify and refine this drawing, or do I start a new one?

I’ve gotten some great comments from my artists group (we are a group of artists of all kinds, writers, animators, singers, and filmmakers, and we meet monthly to share our latest endeavors over wine and snacks.) Of course they said complimentary things, too, but they very astutely pointed out the places I am struggling.

I need to resolve some issues with her right shoulder, her back, and refine the face & hair a bit more. They loved the elbow, which is one of the last things I worked on, so maybe I will try to apply what I learned there to the back, which I worked on very early in the drawing.

I am really enjoying my workshop with Ted Seth Jacobs, he is teaching me new ways to understand what I am looking at. The elbow in the the above drawing is I think most evident of what I am learning.

Paris, 15 years later

I am very excited to learn that I have been accepted to a figure drawing program in Paris for three weeks in April 08. The course is taught by former students of Ted’s who live and teach in France, their school is Studio Escalier. I studied at Parsons Paris for 6 months in college, back in 1993, so I am looking forward to visiting Paris as an art student once again, 15 years after the first time.

Notes from TSJ

I have transcribed some more of my notes from TSJ’s teachings. These are some of his overall themes, the ideas he repeats no matter what specifics he is showing us:

“I am not your teacher: nature is your teacher. But you have to have knowledge of the principles of form to understand what nature is showing you. These principles are helpful only as far as they help us see nature. If nature disagrees with a principle, nature is right, the principle is wrong. Nature is our teacher always.”


— Ted Seth Jacobs


Contour

  • Contour is not flat, it is moving in 3 dimensions, back and forward
  • Every contour on the body is held in a balance of tension between opposing forces.
  • Every change in the contour is a result of 3-dimensional form


Light and shadow


  • Everything is divided into light and shadow. Always know whether you are working in the shadow or in the light. There is no such thing as “halftone”. There is only:
    Light light
    Dark light
    Light shadow
    Dark shadow
    Accent (the darkest dark)


See the model as a flat ribbon of light

  • Squint your eyes to simplify the lights and darks
  • Don’t worry about highlights, pay attention to the largest masses


    Ask yourself:

  • Which end is closer to the light source?
  • What is the tilt of the ribbon to the light?
  • What is the lightest part of the pose?


Model the smaller forms in harmony with the larger value relationships.


Think about the three dimensional forms, not just a two dimensional pattern of lights and darks.

The edge of the shadow (also called the terminator, or core shadow) is not an impenetrable wall, there are forms criss-crossing through it

[UPDATE 12/2013 - Due to widespread misunderstanding of the term Terminator, I feel it’s important to revise my notes here and state clearly that the Terminator is NOT the same as a core shadow. It’s not even the “edge of shadow”. It’s the ending of the light, at the point where the form turns away from the primary light source. Ted never called it a Core Shadow, that was my misunderstanding 6 years ago when I took these notes. -SJV] 

Shape the light to describe the form;
See what end is wider, which end is narrower; it’s often a “fan” shape, edges are never parallel

Form principles

  • Even a concave shape is made up of tiny convex forms
  • Each shape is a wedge that interlocks with other wedge shapes
  • Find the specialness of each shape
  • Make a portrait of each shape

We are not copying: copying is trying to capture what you see without understanding what you are looking at.
We are not representing reality; we are suggesting reality.


Thursday
Nov292007

TSJ Workshop - Reclining Nude I

18 x 24 inches, pencil on paper

We are now in the 4th week of Ted Seth Jacobs' drawing workshop at BACAA.

This week we started drawing a 3-week pose. Today is the 4th day, and I spent the first 3 1/2 days struggling with the block-in. I don't know what it is, something about the leaning tilt, but it is an incredibly difficult gesture to capture. I erased and started again a half-dozen times. But practicing a block-in is a good exercise, so the time was well spent although I don't have much to show for it.

This is an interesting stage of the drawing, because you can see the earliest marks of my block-in, especially at the feet, as well as the more polished part by the shoulders.

While I draw I repeat in my head over and over "rounding and ending", which I described here. The practice of thinking about the three-dimensionality of each protrusion is a a new technique for me. Also, being conscious about which sides of a shadow are soft, and which sides are crisp is really helpful. Repeating "rounding and ending, rounding and ending" helps me remember.

I have also been thinking a lot about how to paint and draw nudes, especially female nudes, without relying on a traditional idea of beauty as a hook. I think about how to depict an individual without reducing her to an idea of a woman. There is so much history to contend with, it's hard to resist. The temptation is to emphasize her beauty. Especially because this model is tall and slim and attractive, and especially because she has been arranged in a classical pose.

My goal is to try to depict her as a real, breathing human being. Let's see how I do.

Tuesday
Nov202007

TSJ Workshop: Head Study Day II

Looking at anyone from this angle makes their face look wide and their nose upturned... but Melissa does not have a wide face nor an upturned nose. I think in this version she looks more like herself than in the previous session, where she looked like some sort of plump Swiss Miss character.

Ted has been teaching us about "rounding and ending" a shadow. This is where a shadow is shaped by the light falling over the rounded edge of a form, which makes a soft gradated edge. Then the shadow ends in a crease, a hard edge, before the next rounded form begins.

This hard edge is eventually slightly softened through "knitting" the two forms together, but the basic idea is seeing where the shadows have soft edges (over a curved surface) and where they have firm edges (at the crease between two forms).

You can see this most explicitly at the hollow in Melissa's upturned cheek. (It's even more exaggerated in this photo of the drawing, and I will say, it's very frustrating to work for two days to calculate every value, just to have it all destroyed in the photo!).

Anyway, you can see how the shadow rounds down off the hight point of her cheekbone, and falls into the crevice above her jawbone - "rounding and ending". I tried to practice this all over the drawing.

At this stage (about 7 hours into it) the forms are all still generalized, but if I had more time with this pose I would go further and see how many sub-forms I can find.

Had fun with the hand and it went very quickly - I did most of it in just two 20-minute sessions. You can see the "rounding and ending" concept over the tip of the index finger quite clearly, too.

Monday
Nov192007

TSJ Workshop: Head Study

pencil on paper, 3 hour pose

I decided to try a new drawing of just the model's face and hand these last two days of the pose.

Something is not quite right... the angle is difficult, but I was hoping to catch more of a likeness, and this doesn't look much like Melissa. I'll try to discover what is wrong tomorrow.

Saturday
Nov172007

TSJ Workshop: Melissa Day 5

pencil on paper, 12 x 18 inches, detail
Day 5


Next week is short because of the holiday, so I'll only have two more days on this pose. I think I am done with this drawing, so I may start a new one just of her head and maybe her right hand near her face. It would be fun to try the face larger and with more detail. Not often I get an angle like this to work from.

Ted's comments are that I am making things "too straight" (like the shadow on the thigh, or the top edge of the calf). Which makes sense, because I have been practicing a straight-line block-in all year!

But I can see that Ted is right - the body feels more real, specific, organic and yes, organized, when all the compound curves are articulated: muscles wrap around bone, the bone itself is thick and thin and twisted, irregular wedges notch into asymmetrical arches; nothing is constant or machined.

On the other hand, it's very hard to get accurate proportion without focusing a good amount of time and attention on a straight-line block-in at the beginning. I would say it's impossible. After this year's training, I can always tell if someone is NOT using a block-in.

My idea is melding the two approaches. Blocking-in with straight lines to get all the tilts and distances to be accurate. Then using Ted's way of seeing to express the myriad organic structures that make up the whole form.

Thursday
Nov152007

TSJ Workshop: Melissa Day 3

pencil on paper, 12 x 18 inches, detail
Day 3

This is the drawing I am working on right now during Ted Seth Jacobs' 6-week figure drawing workshop. This is day 3 of a 10-day pose. You can see earlier stages of the drawing here.

I have blocked in the general proportions, refined the contour, and lightly sketched the main shadows. Now I am trying to create the smaller forms according to the philosophy Ted has been teaching us.

In the mornings, Ted draws from the model for us and demonstrates all the forms and sub-forms he sees on the model. He shows us how everything fits together, interlocks, and how the individual forms describe pathways along the body to create a network of structure.

I am trying to do the same in my drawing. Ted is teaching me how to see how gravity and pressure affect the masses of the body, and it is giving the figure more weight and substance. I think you can see the difference in my earlier drawing of Melissa I did last March.

Obviously the earlier drawing is of a very different pose, but you can see the forms are more simplified and generalized; less specific, and more "floaty".

In contrast, I feel like the models' legs in this drawing are pressing on the surface and on each other.

Seven more days drawing this pose, stay tuned :)

Wednesday
Nov142007

TSJ Workshop: Melissa, Day 1 and Day 2

pencil on paper, 12 x 18 inches, detail
Day 2

Block-in stage
Day 1

This is the drawing I am working on in Ted Seth Jacobs' workshop. This will be a 2-week pose, so I am trying to take my time. After I refined the block-in, I focused mainly on the feet. I'll move to other areas each day.

(You can see Ted's sketches of the structure of the foot and head in the top image, which he drew for me when he came around to critique my drawing.)

I have lots of notes from the last few days, will write them up soon!

Thursday
Nov082007

TSJ on "Structure"

graphite on paper (detail)

18 x 24 inches, graphite on paper

Ted lectures in the mornings, and in the afternoons we draw from the model.

Below I've summarized some of his concepts and diagrammed my drawing to show how I am attempting to apply his techniques:

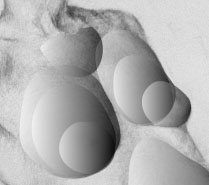
Contours, (the visible "lines"), are affected by the bulges and masses which make up the structure of the body. There are NO concave lines, because the human body is full and has volume. Even very slender people have substantial mass and volume. A concave contour is actually made up of a series of small convex forms.

I've traced the contour lines I drew as they enter the body and correspond to interior structural masses.

These contour lines are arranged, visibly or invisibly, along the body. The structural masses are arranged along these pathways, making a basketweave pattern throughout the form (under and over, in a network).

Structures of the body are arranged in "families" of forms. Each structure has a rounded shape, growing darker as it turns away from the light.


The darkest edge of a form usually ends just before the lightest edge of the next structure, creating a layering of forms and sub-forms.


Ted on Organization of the Body:

The hallmark of the classical approach to drawing is that nature is organized.

Everything is designed with an economy of space, form, and function.

Features of the body are never like snowballs thrown on randomly.

See every point in relationship to the whole; nothing is in the right place until everything is.


Ted on "Structural Pathways"

All the forms of the body are arranged on curving pathways, never straight or angular.

These pathways create a network, like a hairnet.

Pathways exist in 3 dimensions like a basketweave - sometimes on the surface, sometimes burrowing underneath.

Pathways exist in two sets of arches, some arching up and some arching down.


Ted on Structural Forms:


Structure is a vocabulary of forms.

Shapes grow on the body outwards: ample, convex, superimposed, smaller in top of each other.

Universal structural shapes are modified by gesture: squashed, stretched, twisted.

Sometimes forms are so modified they are unrecognizable.

See how these structures are perceived through the actions of light.

Forms are layered - every form can be reduced to its underlying mass.

The body is not a smooth surface, it is made up of specific shapes, it is "particulate".

Train your eye to see the "specialness" of each individual shape.

Continuity - everything in the body connects in a fluid, continuous manner.

Contour reflects the 3-dimensional structure of the form.


Ted on Perception:

Monocular vision (like a camera, or closing one eye) has less perception of form - two eyes "wrap" around the form.

Don't use tools like plumb lines and measuring rods - make yourself the measuring instrument.

Only one point of your subject is NOT foreshortened, the point directly in line from your eye. All other points on the subject are forshortened to a greater or lesser degree.

Drawing is all about recording what you see without being distracted by the symbolic, verbal, abstract symbols of what you are seeing (like the almond/dot egyptian symbol for "eye", which has nothing to do with what a real eye looks like).

My current favorite quote from Ted:
"Drawing is an exercise in human fallibility - it shows how wrong we can be."

Tuesday
Nov062007

Ted Seth Jacobs - Figure Workshop

This week I've begun Ted Seth Jacobs' 6-week figure drawing workshop, offered through the Bay Area Classical Artist Atelier.

So far I have come up with this summary of my impression of Ted's method for figure drawing. (Note: This is my impression, and not a direct quote, he may describe it differently):

The human body is an organized, "designed" system of interlocking structures.

This interlocking system as a whole is affected by the downward pull of gravity, and also by the upward pressures of supports.

The whole or the parts can be seen as being pulled and pushed, resulting in draping (like a suspension bridge) and bulging.

Pressure from supports (like a chair, etc) makes the masses of the body take on the characteristics of the underlying support.

Ted draws figures with all curved lines. He feels that sharp corners are antithetical to life, and would result in "starvation, disease, and death!" (he says with a deep ominous tone, and then a chuckle).

As you can imagine, I am having a hard time reconciling this, considering I have spent most of 2007 studying a more formal, straight-edged block-in method.

But I believe there is a correlation between the two approaches - both are investigations into the underlying system. One uses perfect arcs and straight lines, the other uses undulating curves. But both are looking for the structure, the system, the truth, the architecture, the energy of the human form.

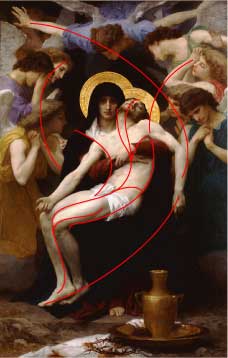
Ted looks for lines of action, grouped in "families" of similar directions. He teaches us that every contour (visible line) is in direct relationship to these invisible lines of movement.

Today he drew a demo for us of Bouguereau's Pieta at the Legion of Honor museum here in San Francisco. This is my approximation of some of the relationships he diagrammed for us:


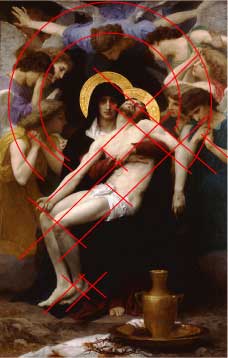
Below, the more formal/rigid analysis I've been practicing these last few months. I try to find main angles that repeat in parallel all over the form. The angel of the jaw as it correlates to the angle of the ankle, and everything between.


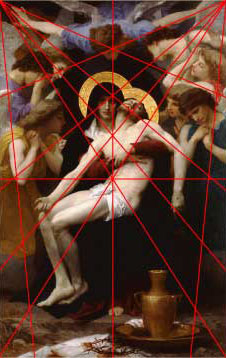
And this last one is for fun - it's more about the composition and architecture of the entire painting, versus the structure of a single figure. It's fascinating to find these diagrams in a painting, so clear and yet hidden at first glance. We feel it before we see it:


As a final note: My favorite concept so far from Ted:
"The simplest definition of a 'gesture' is an action showing intention, or desire."