Varnish: Tips and Techniques
 Tuesday, April 26, 2011 at 2:04AM
  I have recently polled all my artist friends and researched extensively online to find the best method for getting a perfect finishing varnish on my oil paintings. After lots of practice, I finally have a method that gets great results every time…. Well, almost every time. Varnish is a notoriously tricky procedure!
What is Varnish?
Varnish is the final clear finishing coat applied over a “dry” oil painting. Varnishing seals the surface of the painting, protecting it from dust and dirt build-up. It also restores an all-over sheen to the whole painting, deepening shadows and restoring colors that may have gone matte as the paint dried.
How “Dry” is Dry?
Traditionally, artists waited 6 months to a year before varnishing. And that’s for thin paint! Thick globs of oil paint may actually take many years to dry completely. However, if you are actively showing or selling your work, or working on commission, this is highly impractical to nearly impossible. So, many artists varnish when the painting is “dry to the touch”. There is danger of cracking however, especially if the paint is thick and you are working on flexible canvas.
What Kind of Varnish?
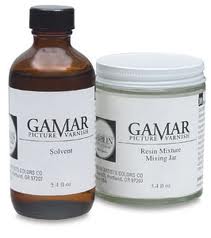
Damar is the traditional varnish used by artists, made from tree resin. However, it is known to yellow with age, and it is also very brittle. Gamblin, manufacturer of paints and mediums, has developed a synthetic-resin varnish called GamVar that has been designed to remain transparent, and also is less brittle. In fact, GamVar says you can apply their varnish when the painting is dry to the touch. Apparently GamVar allows the painting to continue to dry underneath the varnish. Personally, I find GamVar significantly easier to apply, as it stays “brushable” for some time, and does not get tacky within seconds like Damar. So, now I never use Damar, and I only use GamVar.
Removing Varnish
Varnish is made to be removable by anyone in the future cleaning or restoring your painting. It is designed to dissolve easily with odorless mineral spirits (OMS). It’s hard to imagine rubbing OMS or turps on your oil painting, but keep in mind, dry oil paint has a very strong film and won’t simply wipe away with gentle swipes of OMS. So the good news is, if you mess up your varnish, it’s easy to remove and re-apply.
You will need:
- GamVar Varnish
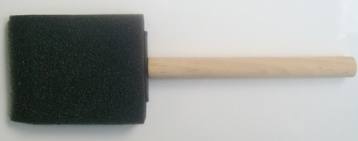
- Sponge brush (Buy several, they are cheap)
- Small shallow dish (larger for a large painting)
- Small soft paintbrush, like a #1 sable filbert
- Low-lint cloth
(There is no such thing as “lint-free” but do the best you can. I use floursack-style dishcloths, although I recently discovered soft auto-cloths, almost like baby diapers, which I am going to try next.)
Lint is your Enemy
Lint (and dust) will conspire to flock to your painting in massive unforeseen hoards. The largest airborne bits of debris you have every seen will suddenly appear to hover above your freshly varnished painting in a great, slow mating dance. Your job is to keep lint off your painting, and off everything else that might come in contact with your painting.
Prep
Never varnish the day you ship, frame, or deliver a painting! Give yourself a few days of extra time, both for the sake of the painting, and for your own sanity.
Varnishing with GamVar for the first time takes a bit of advance planning, because it comes in a box with 2 ingredients you must mix together in a jar 8 hours before you use it. The directions say to shake the jar every hour for 8 hours, but I have found this to be impossible - who could do that? So I just shake the jar once or twice over 8 hours, as I think of it, and it has always worked fine.
Once the GamVar is ready to use, take out your dry-to-touch painting and inspect the surface. Use tack-cloth or adhesive tape to remove any dust or lint that has accumulated. If there is a lot, you may want to wipe down the surface gently with a clean, low-lint cloth dipped in a bit of OMS.
Next, set your painting on an easel and shine a lamp on the painting for a good 30 minutes (don’t lie the painting down flat or it will just accumulate more dust). This will evaporate any moisture on the surface. If there is moisture on the surface, the varnish will “bloom” - a horrifying phenomenon, where you may think you have achieved a perfect varnish finish, only to find that within a few hours that the surface has developed a opaque white haze. Don’t let the painting get too hot, but it should warm a bit under the lamp.
Ready, set…. VARNISH

When you ready to apply the varnish, use SPONGE brushes. They are cheap, they don’t leave any stray hairs behind, and best of all you can just throw them away when you are done. I keep a batch of fresh my new ones in a plastic ziplock bag, so they don’t gather dust before use.
Pour a very small amount of GamVar into a clean, lint-free dish. It’s easier to dip the brush in a shallow dish, and also you won’t be contaminating your nice clean varnish jar with the inevitable dust or debris on your brush.
Dip the tip of the sponge brush in the GamVar, and then brush on a thin coat over the painting, using long, horizontal strokes to cover the entire surface. Then, blot (don’t rub) the brush on a clean, low-lint cloth.
Brush again with the slightly dry brush with strokes perpendicular to the first ones. Blot your brush on the towel again.
Repeat over and over, brushing and blotting, in perpendicular strokes, until the surface starts to tack up the tiniest bit, and “grab” the brush.
This is reducing the glossy shine of the varnish, which can make the painting look too wet, and will make it too shiny, especially under bright gallery lighting.
Waiter, There’s a Fly in my Soup!
What to do when you get lint in your varnish: Use the small #1 filbert to carefully “back brush” and lift the lint out with one swift flick, and wipe on the cloth. If you don’t dig around too much, the varnish should “heal” and there should be no sign you messed with it.
The Inevitable Do-Over
At some point everone has to re-do a varnish job. If you have lots of lint, or bloom, or if the surface was touched or damaged, you’ll have to remove the varnish. To remove, dip your clean lint-free cloth in odorless mineral spirits, and gently wipe (or even roll) the cloth on your painting. Be careful not to damage the painting, but keep in mind, it’s probably more resilient than you think. Dry paint film is pretty strong. Wipe until it seems like all the varnish is gone. If you are not sure, wait a few minutes for the OMS to evaporate, and then look for glossy areas. Start all over again, starting with removing any dust or lint.
Varnishing a smooth painting
My paintings have a pretty smooth surface, which adds another issue to varnishing: Beading up. Sometimes the varnish immediately beads up just like water on a new car. This is because the surface is so smooth that the varnish has nothing to “grab”. You need to get some tooth in your surface. Wipe off the wet varnish with a cloth dipped in OMS. Then brush on a generous coat of OMS, and keep brushing until there is no longer any beading up. You may want to let the painting sit for a while, to let the OMS “bite” into the surface.
Be gentle, don’t rub hard, and the painting should be fine. When a coat of OMS does not bead up, the varnish won’t either. Put your painting under a lamp to evaporate the OMS, and then go ahead and varnish. Now I always brush on a coat of OMS before applying the varnish, to test for beading before I ever try to apply the varnish. NOTE: use one brush for OMS and a different brush for varnish. You don’t want to dilute the varnish with the OMS left on the brush.
Varnishing is tricky, and it’s always a good idea to practice on a small painting you don’t care much about before varnishing your masterpiece.
Good luck! If you have other tips or suggestions, feel free to leave them in the comments.
Reader Comments (8)
thank you for your explanations Sadi.
Thank you for an excellent website with lots of useful information.
I've painted for over thirty years and have varnished using brushes and rollers with variable results and to be honest in the last few years I've found aerosol varnishes the best especially if you're able to apply a few coats. It may not have the satisfaction of the craft element of applying varnish in the way you recommend but it is quick and effective.
I daresay environmentally it's not ideal but if that were the prime consideration I suppose we wouldn't be oil painting.
best wishes and continued success
Tom Wood
Sadie, thanks for a really informative post on varnishing. Removing lint from the painting before varnishing is difficult, but I have found cosmetic sponges to be very effective and lint free. I have also been using them lately to apply a thin coat of medium when I prepare the surface for a panting session instead of a brush. They are inexpensive and come in a variety of sizes and shapes and can be found at any drug store.
Thanks for your wonderful blog, I love your work. I am currently visiting Charleston, and will be at M Gallery this evening and hope to see some of your work there.
Julie Messerschmidt
Hi Sadie!
I just wanted to thank you for your highly informative Gamvar post. I followed your directions to the "T" and it turned out flawlessly. Working with Gamvar ended up being no where near as terrifying as I thought it would be thanks to your easy steps. I bought my Gamvar package years ago and did not have the courage to try it out until now.
You have definitely made me fan for life!
Thanks again!
-Suzanne
Varnish helps in reducing the transfer of moisture between the wood and the surrounding weather. It also provides softness and lasting flexibility.
Very helpful post, Sadie. I love your website.
~Stephanie
Do you know what you are missing? Grab the chance to see the latest lint remover, and have fun with it at www.SecretKidCleanup.com