Search this Blog
Sadie's Blogs and Website

For posts 2006-2010
please visit
sadievaleri.blogspot.com

Sadie’s current site is at
SadieValeriAtelier.com

UPDATE February 1, 2021

I have recently discovered that unfortunately this Squarespace blog has failed to maintain most the images for older posts on this blog. Luckily, the original Blogger version is still live at sadievaleri.blogspot.com and all the posts and images from 2006-2010 are still visible there.

For my current artwork, teaching, and blog please visit Sadie Valeri Atelier.


Entries in still life (130)

Friday
Aug292008

Wax Paper and Ribbon: FINAL (SOLD)

Wax Paper and Ribbon SOLD
oil on panel
12 x 12 inches

See the previous post for this painting


This painting will be showing at San Francisco's ArtSpan Open Studios Exhibition beginning with the Private Preview Gala October 4th. Each participating artist submits one piece to include in the show, so it should be a pretty eclectic event.

I will also be opening my studio to the public as part of ArtSpan's Open Studios for the weekend of October 11 & 12. More details coming soon.

Friday
Aug222008

Wax Paper and Ribbon: Session 10

session 10 (detail)


I worked most the day on the wax paper, but after nearly 3 days staring at the same texture my mind just about revolted, so I switched in the late afternoon to working on the pedestal bowl. It's silver but it's all tarnished and it was SO much fun to paint. I barely had to fiddle, just cranked out the whole layer in one pass. I'll probably deepen it later with some glazing when it's dry, but it's fairly done I think.

I really like the feel of working on a layer of transparent medium - I coat it all over the area I'm going to work in, and then the strokes go on silky but just a tiny bit of grab, especially if it's had a few hours to set. I just use a simple medium of 1 part stand oil and 2 parts linseed oil.

Friday
Aug222008

Wax Paper and Ribbon: Session 9

session 9 (detail)
click image for larger version


I spent all day working mainly on the wax paper. I found myself making very different brush strokes than usual. I haven't been paying much attention to brush strokes the last few months because I decided that worrying about my marks was making me pay more attention to my painting than to the subject. So I decided to abandon ideas about mark-making and just pay attention to the subject exclusively.

But here they are, creeping back in. I'm actually excited about it, because I feel like I am making the marks in response to the form I see, and not in response to an "inner eye" idea of what a mark should look like. These marks have a light, feathery touch and flick up at the tail. But it's totally different from how I painted the ribbons, unfortunately.

It will be interesting to see how (and if) this painting comes together.

Tuesday
Aug192008

Wax Paper and Ribbon: Session 8

oil on panel
12 x 12
work in progress


I worked on refining the ribbons more, and another pass on the right half of the wax paper but still fairly general values, nothing specific. I also did a layer to darken down the background, and applied a layer of transparent glaze overall.

I've been having trouble with the under layers "lifting off", and I think it's because the medium I was using contained turpentine/thinner. I switched to a medium of just linseed and stand, no turp at all, and I'm hoping this starts sealing down each layer so I'm not struggling so much with applying the paint.

I'm still filming, but I'll probably just post a nice big movie of the whole process at the end.

Tuesday
Aug192008

Wax Paper and Ribbon: Session 7

session 7 (detail)

I spent some time today on the ribbon area, this is a close-up of the before and after.

Tuesday
Aug122008

Wax Paper and Ribbon: Session 6

12 x 12 inches, oil on panel
in progress: "ebauche" underpainting

See the previous post for this painting


I had a studio drama today. I tried to make a tiny adjustment to the wax paper in the setup, and accidentally knocked an entire loop of ribbon off of the silver platter. The loop then flopped over the rest of the ribbon pile, pretty much distorting every inch of the curls. AACK.

I held my breath and spent several tense minutes nursing all the loops back into their respective positions. For several horrible moments I didn't think I'd be able to salvage it, and imagined all the work involved to re-draw and repaint it - I've already invested 20 hours of work onto this little 12 x 12 scrap of board. But thanks goodness, the satin fabric had some "memory" of the curls they have been sitting in for a week now and eventually they settled back into a fairly close semblance of their original position.

Anyway, it sounds small but I was pretty shaken imagining 5 days of work nearly negated, and had to stop painting and watch an hour of TLC "What Not to Wear" to recuperate. Drama drama.

Once calm I resumed painting and managed to finish the second layer of underpainting. I even remembered what it's called, this opaque underpainting: "ebauche". I guess that's what I am doing.

I'm excited to have such a developed foundation to start the "real" painting on. With the earlier stages of contour drawing and underpainting there is no magical illusion, just preparation - all the work but little satisfaction. It will be fun to paint on this surface where I have already taken a stab at the drawing, value and color decisions.

Now the painting needs to dry before I can continue, which is good timing as I have a friend arriving from the East Coast tonight to visit and won't have time to paint for a few days.

I am continuing to film the time-lapse, but editing it and posting it take a lot of extra time so I won't be posting the videos very often.

Finally, thanks to those who have written me such encouraging emails and comments. I consider this my own personal art journal but it's always really nice to know other people are enjoying following along, and I think all artists need as much encouragement as we can get. So thank you, it means a lot to me.

Monday
Aug112008

Wax Paper and Ribbon: Session 5

12 x 12, oil on panel

After completing the umber underpainting yesterday I started the opaque layer.... at least I thought I did. I am trying to keep the paint fairly thin and under control, and also within a slightly reduced value range (I'm not going up to the lightest lights yet) so even though I am using color plus white and the paint is more opaque, it's functioning more like an underpainting.

I find myself thinking several steps ahead: not painting what I want the final painting to look like, but thinking what the next layer of paint will look like on top of what I am currently painting. But I feel like I'm in deep water, I guess because I am sort of teaching myself at the moment.

By the way, a fellow artist blogger who is re-teaching himself to paint and draw using traditional techniques has recently come back online after a break from blogging with some astonishing work. I think you'll enjoy seeing what he's up to, here is his site: Learning to See

Sunday
Aug102008

Wax Paper and Ribbon: Sessions 3 and 4

underpainting (sessions 3 and 4)

My goal was to really work to get the large major areas of value correct in relationship to each other, so when I start with opaque paint at a more detailed level I'll know I am working within the correct general range of value as it relates to the whole painting.

I'm trying to keep the edges soft, because putting in a hard line can make problems later on if I want to correct something. I'm also keeping the paint very thin and in control. Any two values next to each other are kept very close at this stage, no big jumps. I've found that forging ahead to carve out the lightest lights is satisfying and gets instant "popping" results, but can make problems for me later. Therefore, the whole thing looks a bit dingy at the moment.

Sorry no video demo today - I've filmed it, but we're having technical difficulties.

Friday
Aug082008

Wax Paper and Ribbon: Session 2

preliminary drawing (session 2)
graphite on panel

Yeah I know, this one looks nearly identical to the previous version. It's hard to believe I put another several hours into it. But there are always drawing errors that dog me throughout the painting, so this time I'm trying to resolve the drawing issues as much as I possibly can.

Friday
Aug082008

Wax Paper and Ribbon: Session 1

Wax Paper and Ribbon
preliminary drawing
graphite on panel

I've started a new painting, this is the drawing I've done directly on the prepared wood panel.

I've been taught to do the drawing on paper first, but I've found that when I transfer (trace) my contour drawing to the panel, too much is lost. My linework is degraded so much that I have to spend a lot of time correcting on the panel anyway. So now I draw directly on the panel from start to finish.

The drawing lessons I learned from Juliette Aristides, Ted Seth Jacobs, and Tim Stotz are what I think about most while I draw.

First I rely on the block-in method as taught to me by Juliette. I use long, straight lines to find the major "tilts" of the contours - I try to make just 4-5 lines at first to summarize the entire composition, being as accurate I can with the overall tilts.

Then I break down these straight lines into smaller segments, and compare the drawing constantly to what I see in life, until I have a straight-line block-in that I feel captures the overall proportions and feeling of the composition. The block-in has to have the strength and harmony I see in life... if it doesn't I'm not done with it yet.

When I am happy with the block-in, I gradually switch to a more detailed contour, based on Ted's and Tim's methodologies. I think first about movement - looking for large, curving lines of energy and movement throughout out the composition. I watch for movement lines that flow through the entire setup, and look for "events" (folds, shadows, structures) happening along those lines.

Our natural inclination as humans is to simplify and straighten and align, so I constantly fight against those tendencies. Weird shapes are hard to conceptualize and something twisted and tilted inevitably ends up smoothed and straightened when we try to understand it. The key is to make shapes as unusual and specific as they are in life. As Ted says, "draw a portrait of every shape". I like that... a portrait is specific and unique, not generalized or simplified.

The other thing I do is "check the feeling" a lot. I stop drawing and ask myself, how does it feel? If the subject feels warped, crumpled, leaning or twisted, does my drawing feel the same? Feelings say a lot. I want drama and energy in my drawing, and I feel drama and energy when I see the light filtered through a twisted and crumpled piece of translucent paper. My painting will never be successful if I don't capture that feeling.

Next session I'll spend time refining the drawing further, and maybe move on to the first layer of the underpainting. If you are interested in seeing this painting progress, please subscribe to my blog for updates by entering your email address in the right column.

Monday
Aug042008

VIDEO DEMO: Wax Paper II

This movie is hosted on YouTube, which greatly degrades the quality. Click here to see a better quality version of the video demo.

Friday
Aug012008

Wax Paper II - SOLD

Wax Paper II (SOLD)
11 x 14 inches

oil on panel


After my last experiment with painting crumpled wax paper, I decided to really challenge myself and crumple up the wax paper and wrap it around a vase - and for a little extra snappiness put in a second crumpled piece of wax paper to kind of hang over the edge of the table and cast a shadow.

Yeah, I thought it was a good idea.... but I had no idea what I was committing myself to!!

Anyway, instead of taking process photos, this time I filmed the painting process. My husband helped me set up his super-duper professional movie camera to take one picture every 10 seconds for 60 hours. But it's going to take me some time to edit it into a nice little movie, so it will be a few more days at least before that's posted.

If you haven't yet, please sign up for my mailing list in the right column so you can be notified when I post the movie!

UPDATE:
> Watch the video demo of how I made this painting

Monday
Jul072008

Wax Paper I

Wax Paper I
11 x 14 inches

oil on panel


I began with a detailed contour drawing the same size as the final painting, and then transferred the drawing to the panel:


It was so much easier to do the underpainting having solved many of the drawing issues already. I used brown and black, and just used paint thinner to lift the paint off again for the lights and whites:

Stage 2 of the underpainting, still using just brown and black and thinner:

A first pass of basic color. I was worried at this point that I wouldn't be able to capture the feel of the wax paper's transparency, but I felt better when I refined the lower right corner of the wax paper shape and started getting a feel for it:

This is where I missed photographing a few stages. I worked especially hard on the ellipse shape of the rim of the dish, it's so easy to make a painted rim look distorted:

Now that the pitcher and dish were complete, I spent the last several days of work just focused on the wax paper, moving from lower right up to the top:
The completed painting:

NEWS: Two July Shows

I currently have 18 paintings on display right now. Nine are at my eye doctor's office, Dr Marcus, who likes to show a rotating series of art on his waiting room walls. My work will be on display through July and August, and the office is located at:
512 Westline Drive in Alameda, CA

My second show is at Frank Bette Gallery, also in Alameda, and there will be an opening with wine and refreshments this Friday July 11. I'm honored to have had all 9 paintings I submitted accepted to their group show "Still, Life". Frank Bette is located at
1601 Paru Street at Lincoln Ave, Alameda, CA

Oh and an update on the Stow Lake landscape I started last month.... due to the fog and also the smoke from forest fires, there hasn't been a clear sunny day in San Francisco for a month! Even when it is mainly sunny the light has a disturbing filtered feel to it, like we are living in air the color of weak tea. I'd like to paint outside again, but summer in San Francisco may not be the season. We usually have our nicest days in September, oddly enough.

Tuesday
Jul012008

Sneak Preview: "Wax Paper I" and Thoughts on Realism

Wax Paper I (detail)
11 x 14 inches
oil on panel
(work in progress)

This is just a cropped detail of a larger painting I am working on right now - so far 26 hours and counting. My good camera is broken so I've had to photograph the stages with my inferior "point-n-shoot", but the good camera is being fixed soon so when the painting is done and the camera is fixed (whichever comes later) I'll post the final painting and all the stages.

I decided that posting frequently was making me feel like I had to complete something "postable" every few days. Sometimes a little pressure is good, but sometimes it makes me rush my process. So I'll be posting less frequently, but when I do I'll have something substantial to show, and I'll still publish all the process photos.

In the meantime, here are some thoughts I've had rattling around my head about realist art - or maybe it applies to non-representational/abstract art as well:

When we look at a painting we are confronting a situation of real/not real. Our minds flutter between these two paradoxical concepts embodied simultaneously. This flutter quickens to a thrum, and it is in this space, the simultaneous holding of the paradox, that our beingness is felt.

When we create, we are experiencing beingness – the loss of awareness of self, the loss of awareness of past and future. Nothing but the present moment exists, a true experience of reality. This state is difficult to enter, but in recording it an artist shares the experience. Looking at a painting we get a glimpse of this state of being.

The act of painting elevates the subject. Mundane objects are infused with an epic, monumental quality. Like a scent that fills us with longing for a certain afternoon years ago, a memory, the shadow of reality, can often strike us more deeply than the original. Paintings are the shadow of reality, the record of a memory. Through painting we reveal a depth of reality in the moment that can touch us more deeply than the subject itself.

Monday
Jan142008

White Pitcher with Tulips SOLD

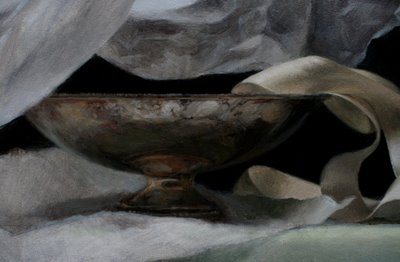
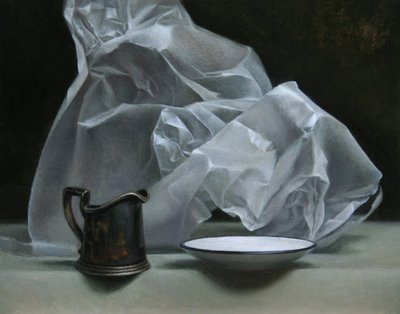
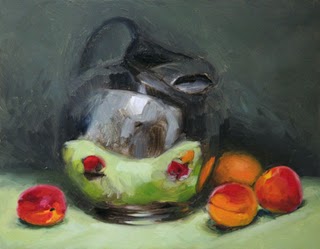
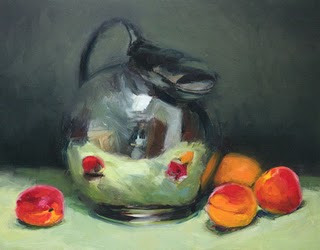
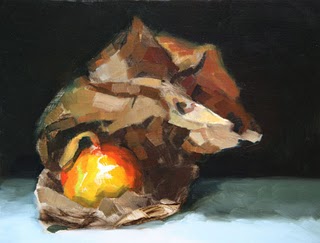
9 x 12, oil on panel

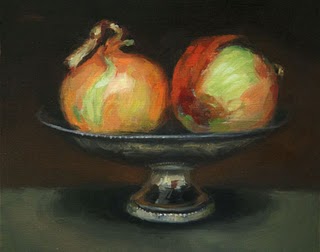
After my little monochromatic studies last week, I decided to try a larger color painting. I painted this over two days, about 3-4 hours per day. The progression is below:

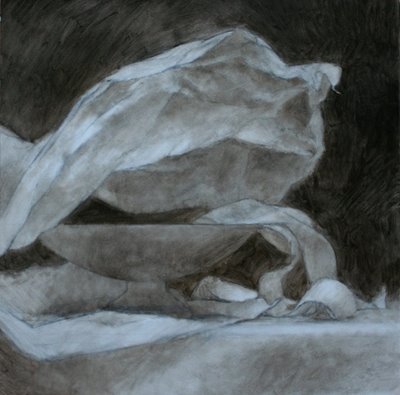
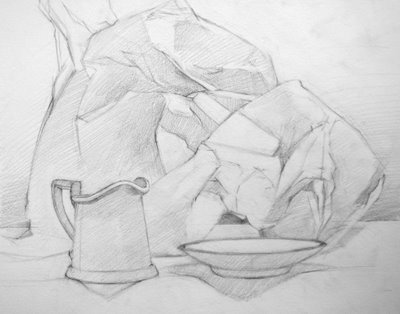
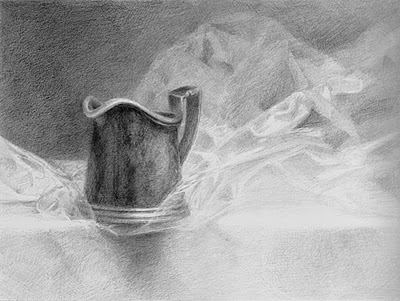
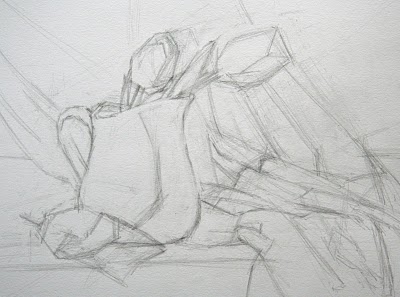
I started with a quick drawing. I spent an hour just doing a basic block-in with pencil on paper, to work out the composition and get the main proportions right. It's tempting to skip this step, but it saves so much time and struggle with the paint later on.

Next I tranferred the drawing to the panel. I use transfer paper, which is a tissue paper with a thin layer of graphite coating one side. I taped my panel to my table, taped a piece of tranfer over that with the graphite-side down, and then I taped down my drawing over it, pressing the corners to match up the drawing to the panel underneath. Then I traced the major lines of my drawing with a hard pencil.

After I transferred my drawing, I went over the faint graphite lines on the panel with a brown extra-fine sharpie. Some people use a quill pen and sepia ink. That's too much work for me, but I would like to find a lighter-colored sharpie.

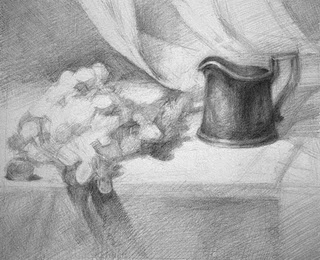
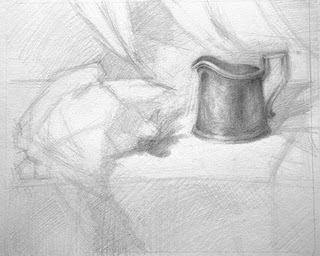
This is my drawing taped below my panel. The drawing has a lot more detail, so I ended up taping it off to the right so I could see it while I worked on the underpainting.

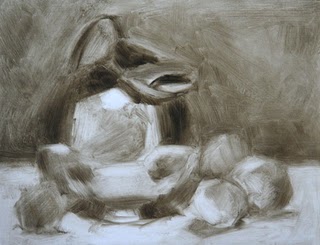
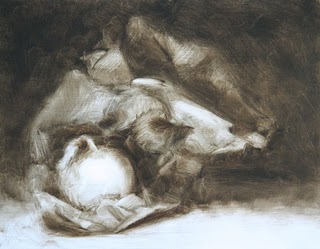
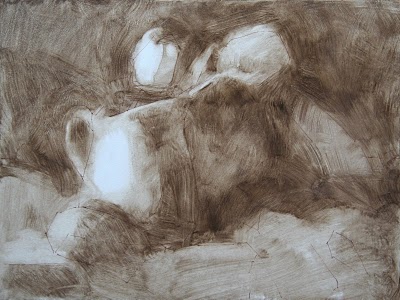
This is the start of the underpainting using the wipeout method. I used mainly raw umber, with a little ultramarine blue and a little white mixed in. I used a Viva paper towel as a rag to wipe out the white areas. I love Viva paper towels, they are the best for painting - almost as strong as cloth and not many fibers.

More refined stage of the underpainting.

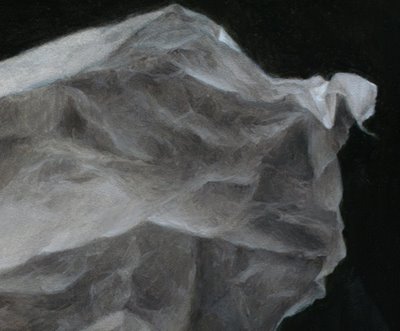
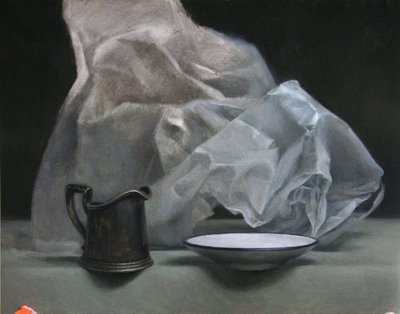
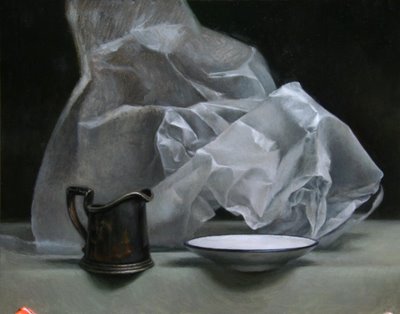
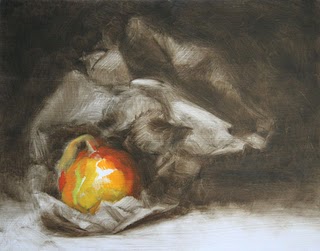
I started adding color. At this point I left the painting for another day.

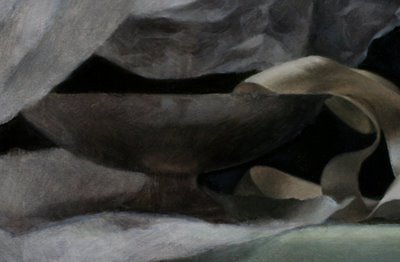
The second day I just worked at refining my colors and getting more detail. The overall look at this stage was very impressionistic. I was trying not to blend very much, keep the brushtrokes visible. I tried to work from dark areas to light areas, mixing a lot of color into the midtones.

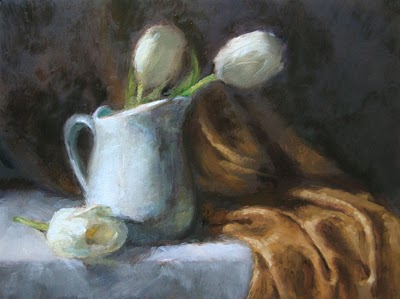
The final painting. I'd like to do just a drapery study sometime, it was really fun. The tulips were ideal flowers because they last a long time and don't change much over a few days. They stayed fresh because my studio is very cold. But as I worked with my space heater turned on, the flowers warmed up and opened. I have no idea how people paint flowers in detail... even stable ones like tulips move too much.

Finally, here's a picture of my current studio setup:

The large white panel at the top is a piece of foamcore I have hung from the ceiling, to block my still life setup from the skylight. The light from the skylight falls on my easel, but not on the still life.

I've lit the still life with my white light "daylight" lamp from the left side. I also tried clamping my palette to my easel, as you can see. I abandoned that after 1 day though, it was annoying. But I hate having one hand occupied holding my palette all the time.

One day I will find the perfect clamp that will hold my palette right where I want it....

Thursday
Nov012007

Pewter on Plastic

9 x 12 inches, graphite pencil on paper

The scan does not capture the subtlety of the graphite, but you get the general idea.

My goal with this still life drawing was to make a more dramatic composition and attain a sense of depth. Compared to my previous attempts (scroll down to see my other recent still life drawings) I think I did a better job of making an engaging image. But still not quite there yet.

I also experimented with making fine white marks with the eraser into the graphite, and alternating those marks with layers of crosshatching, to create a more interesting and complex surface. You can see it especially on the main body of the pewter pitcher, which I built up with layers of knitted marks.

Thursday
Oct182007

Pewter Pitcher and Grapes Drawing

8 x 10, graphite pencil on paper

earlier block-in stage of the same drawing

My conflict recently is whether to spend my time on exercises and studies, or to try to create finished paintings to the best of my current ability.

The conflict is that working on exercises makes me feel like time is rushing by me while I piddle around and have little to show or sell. But then, painting "finished" pieces always makes me realize how much better I would be if I had spent more time studying drawing, or value, or color, or form as a discrete problems instead of tackling everything at once in a painting.

I have a feeling this is something I will struggle with my whole life.


Thought I would share my latest version of my still-life setup, which has evolved to be somewhat elaborate recently:

I want a more direct, artificial light to fall on my still life so I can see stronger shadows. So I tacked a big piece of white foamcore to hang down from my skylight. The white, general light still falls on my easel, while the the still life is shaded from the skylight, and lit by a little incandescent light on a flexible arm.

I also was struggling to hold up a cardboard viewfinder while I am blocking in the composition. So I set up an extra easel and clamped my viewfinder to it. If I position everything perfectly, I can see my still life setup framed perfectly in the viewfinder, and without turning my head significantly I can also see my easel, and even reach it with my pencil if I am lucky.

It takes a lot of shifting around to get the right position of the viewer, the easel, and my own head, but once it's set up it makes everything so much easier.

Monday
Jul302007

Silver Pitcher with Apricots

11 x 14 inches, oil on panel

I decided to try a longer painting, so I have been working on this one for about a week now. Working over dry or semi-dry paint has different challenges than working wet-on-wet in a single session. It was nice to have the time to refine things a bit more, but I found a whole new set of things I need to learn.

Luckily I am about to begin a marathon of painting workshops. Tomorrow I start a 2-week figure painting workshop with Dan Thompson at BACAA. Later in August I'll be taking a two-week still-life painting workshop with Juliette Aristides, up at Gage Academy in Seattle. I'm really excited about everything I will be learning this month from these two amazing artists.

Here are the process shots taken over the last week:


(Yes, that's me reflected in the middle, with my white painting apron on.)

Thursday
Jul192007

Onion on a Paper Bag SOLD

11 x 14 inches, oil on panel
Process shots:

I spent a lot of time on the underpainting to get the proportions right. The bag leans so far to the right, and we often want to "straighten" things out. Drawing is basically just making your brain stop editing what you see.

I quickly put in the basic colors of the onion first, with saturated, clean colors. I knew I'd spend a lot of time on the complicated bag, and I wanted the onion to be fully incorporated even if I neglected it while the bag developed.

I blocked in the basic structure of the bag with flat brushes. I just bought some new long-bristled Princeton brushes I like, in both flats and filberts. I use a large sable filbert for the background after I have blocked in the color with a bristle brush.

I used smaller filbert bristle brushes, and in some cases a small flat bristle, to refine the various planes of the crumpled bag. At this point I am very happy I spent so much time on the underpainting - the basic shapes are right so I can focus on color rather than drawing.

After a lot more refining, this is the final. It took about 8 hours to complete.

I experimented with Prussian blue instead of my usual Ultramarine, it was a nice change for me. The whole palette was:

Cad Red Medium
Cad Yellow Deep (an orange I love)
Cad Yellow Medium
Sap Green
Prussian Blue
Raw Umber (just for the underpainting)
Mars Black (yes, I just started using black last week for the first time ever)
Titanium White

I used to get really frustrated where a light area meets a dark area - because so much white mixed with so much dark (blue, umber, black, or all three) makes a really chalky, ugly midtone. So I have started pouring a ton of color into my midtones and it has really helped.

Monday
Jul162007

Two Onions

8 x 10 inches, oil on cradled panel

This would have been a whole lot easier if I had just painted the onions, and left the silver platter out of the composition.