Search this Blog
Sadie's Blogs and Website

For posts 2006-2010
please visit
sadievaleri.blogspot.com

Sadie’s current site is at
SadieValeriAtelier.com

UPDATE February 1, 2021

I have recently discovered that unfortunately this Squarespace blog has failed to maintain most the images for older posts on this blog. Luckily, the original Blogger version is still live at sadievaleri.blogspot.com and all the posts and images from 2006-2010 are still visible there.

For my current artwork, teaching, and blog please visit Sadie Valeri Atelier.


Entries in painting (203)

Wednesday
Jul222009

Hudson Fellowship Day 16


Kaaterskill Boulder with Falls (work in progress)
9 x 12 inches
oil on panel

I spent the day at the Kaaterskill lower falls again and worked more on the above painting that I started yesterday. It wasn't raining, so it was a much easier day! I also began another painting below:

Kaaterskill Boulder and Pool
(work in progress)
9 x 12 inches
oil on panel

Having fun, planning on working on both more tomorrow. Now, sleep....

Tuesday
Jul212009

Hudson Fellowship Day 15

It's raining pretty steadily today, but I decided to go to the lower falls (Kaaterskill Clove) and see what I could get done. It worked pretty well, I just set up my new huge plein air umbrella and worked under that for about 3 1/2 hours. With my ipod playing and my raincoat keeping me dry it was even cosy! Benefits of rain: no mosquitoes and no tourists. That and the wet rocks look so pretty and shiny!


I just did an underpainting today. This was all on the advice of a fellow painter here, who says he does a thin color underpainting using the oil paint thinned to the consistency of ink or watercolor.

Progression is below:

Above I started with a line drawing to block-in the layout using a small round synthetic brush, and a paper towel corner dipped in turp for an eraser.

Above I used the burnt umber thinned with turp to lay in the basic lights and darks.

For the underpainting I used turp-thinned paint and kept the values light and the colors reddish. Everything is just a tint.

This is the underpainting as it stands so far. My plan is to continue working on it for a couple more sessions and see how far I can develop the painting in on-site. You might recognise this as the same boulder I drew back on Day 2.

Yesterday evening we went out to do another sunset study. This one again suffers from being too light. Not sure I'm cut out for the lightening-speed approach this requires to capture the hues, values and chroma.


Here's a shot of several of my fellow painters finishing up their studies just after the sun has set. That's Hunter Mountain beyond us, you can see the cut trees from the winter ski trails.


Monday
Jul202009

Hudson Fellowship Day 13/14

"Hudson River from Olana"
9 x 12 inches
oil on panel

Today I went back to Olana today to complete the painting I began last Thursday. Luckily the weather was similar to the previous session. I adjusted the composition and refined the colors and added more detail overall. I also adjusted the shape of the river quite a bit, I think in this version it sits on the plane of the earth more accurately.

Last night I arrived from my lovely weekend off refreshed and excited to paint so I ran out and did this sunset. We've grown to quite a crew of sunset sketchers, there were about 10 of us set up on a high flat driveway area perfect for sunset viewing. Jake said he'd been there all day and saw a black bear running - fast - not far away. I don't think I'll go up there alone!

"Sunset Color Study II"
6 x 8 inches
oil on panel

For my first sunset study I went too dark but on this one I over-compensated and went too light. The hue, value and chroma of each stroke would be hard enough to evaluate if the subject were not also constantly moving and changing! It's a frantic 90 minutes of painting, but also pretty exciting. Random excalamations of dismay erupt from one or another painter at regular intervals.

Thursday
Jul162009

Hudson Fellowship Day 10


"Hudson River from Olana"
Color Study Stage I
(work in progress)
9 x 12 inches
oil on panel

Today was rainy in the morning so we drove to Olana, which is the home Frederick Church built for himself on a 250 acre property. He bought the land for the views of the Hudson River and he designed the landscaping to create ideal compositions. Everywhere you look is an amazing scene for a painting. His house in incredible too, a Moorish-inspired castle, full of artifacts from Church's extensive world travels and lots of his paintings.

We did a tour of the house and after that the sun was shining again so we decided to stay there and work on the grounds. I had my supplies along so I set up my easel and worked for 4 hours on the above study. I'm hoping to go back to Olana and work on it more, the above is just a start.

Also, last night a few of us decided to try sunset studies, below is the result of my first attempt - one hour of ever-changing sunset glory that just about drove me mad. A ravenous swarm of mosquitoes sure appreciated us standing still with hands encumbered by painting tools, and right at dinnertime!

"Sunset Color Study I"
5 x 7 inches
oil on panel

Afterwards I learned from my instructor Edward Minoff that my values (light/dark) are way too extreme and I need to significantly lighten the clouds and everything in the distance. He showed me his study and I could see what he meant.

I can't wait to try both again, but I'll be away from the fellowship this weekend to go visit my husband. So I won't be posting for a few days, back on Monday.

Monday
Jun292009

Bottle Collection FINAL

"Bottle Collection"
oil on panel
18 x 24 inches


I said to a friend recently, a long painting is like reading a good novel - you want to finish it but you're sad when you're done!

This painting took over 3 months, and it's my longest and largest still life yet. Posting photos of paintings online tends to make every piece seem to have the same scale, but this one is significantly larger than any I have done before.

I won't be able to make a movie of this one, but here's a little slide show of all the stages of drawing and underpaintings. You can also click here to see it larger.


Wednesday
Jun172009

Plein Air in Utah

I just spent 5 days in Utah visiting my good friend and fellow painter Janell for a plein air painting trip in her hometown of Park City. The weather was unusually rainy/cloudy/windy for Utah in in June, but we managed to paint between raindrops.

Utah is just incredibly gorgeous and I spent most the 5 days with my mouth agape while admiring the dramatic displays of alternating mist and sunlight rolling off the mountains.


It was very, very cold. I actually had a single HAILSTONE land in my pochade box. Do I get some sort of plein air badge for that?

This pretty little streak of sunlight disappeared as soon as it was too late to change my painting, and only made intermittent appearances for the duration of the session. I spent the time between episodes of sunshine practicing painting the purple sage.


My amazing dad knit me these fingerless painting mittens from the softest green wool. From this angle you can't see, but they even have an intricate cable braid down he back of the hand. Far too nice to use for painting, but he insisted it's ok if I get paint on them.

It was all good practice to get ready for my upcoming month of outdoor painting in upstate NY.

Friday
Jun052009

Dust and Lint Solution: Wet Sanding

NOTE: This started as a brief addition at the bottom of the previous post, but then I ended up describing more details in an email to someone... then realized it's worth devoting a whole new post to wet sanding.

The issue is dust and lint that falls onto the painting or is deposited by linty brushes or rags. It doesn't seem so bad when the paint is wet, but the surface of the dry painting seems to show the impurities more as the paint film dries. 

I usually spend time at the beginning of a painting session blotting up any stray lint on the previous dry layers with a piece of semi-sticky tape, and then again at the end of the day using a tweezer in the still-wet layer, but I still end up with lots of debris. It might not matter for some painting styles, but for detailed glazing on a smooth panel it can be a big problem.

So I got a tip to try wet sanding and it worked really well for me. Here's what I did:

Materials:
  • 1200-1500 grit wet/dry sandpaper
  • linseed or other painting medium oil
  • small bowl for the oil
  • clean, lint-free rag of synthetic material - a microfiber eyeglasses cleaning cloth works great! (cotton rags and paper towels have too much lint)

I used 1500-grit "wet/dry" sandpaper, moistened with a bit of linseed oil. I rubbed any area of the surface that was imperfect: too much medium, or a piece of embedded fiber or dust. It worked really well, I was amazed how the imperfections were healed by the process - most debris lifted right out and left the colors of the painting intact. Small unintentional drips or ridges sanded right off easily. I had to do a bit of touch-up painting in a few areas, but the process was a huge success.

I did the wetsanding on fairly-dry areas - maybe a week of drying. Dry to the touch, but you could probably still gouge or dent the surface if you tried. I was also willing to repaint whatever I messed up. (I wouldn't try it for the very first time on a masterpiece you thought was done and no longer have reference for, in case a little repainting is necessary.)


I was actually surprised how much I could rub and disturb the surface, and still the colors of the paint would remain. In some places the surface fogged up a tiny bit but was pretty resilient. I did leave a very thin layer of oil to restore the gloss in some areas (although I know some people say not to do that and just wait till varnishing.)

Also, it's not sanding like you sand a piece of furniture - I used a tiny folded square of sandpaper bent over one fingertip and pressed very VERY gently and rubbed in a very small area, only in areas that needed it.

Once I sanded I had a yucky layer of wet oil and loose lint, so I needed to find a lint-free way to wipe that off. I found what worked best was a microfiber eyeglass-cleaning cloth I bought at the local hardware store. I could wipe firmly enough to wipe off the wet oil and dust, without leaving additional lint dust like a paper towel or cotton rag would have. 


Of course, a linseed-oil soaked rag is not good to leave around (serious fire hazard), so I washed it in natural turp and then soap and water at the end of the day... so it adds some steps to my normal cleanup.

One more tip: An accomplished painter I know just recommended using "shop cloths" as studio rags. They are extra heavy duty blue paper towels on a roll, I found them in the hardware store. They are amazingly lint-free. I had previously been using well-washed flour-sack dishcloths, and they seemed pretty lint-free but I now suspect they were adding to my dust problems - I seem to have a lot of very tiny white filaments flying around my studio. I'm going to try the shop cloth for a while for wiping brushes while I paint and see if that helps reduce the dust in the first place. (But I still would only use the microfiber eyeglass-cleaning cloth to actually wipe the surface of the painting.)

Let me know if you have any additional tips for cleaning the surface of your painting or dealing with dust in the studio.

Saturday
May302009

Bottle Collection: Overpainting III

Cropped detail of larger painting
full size: 18 x 24 inches
oil on panel


Here are earlier stages of this section:

This first stage is the underpainting and you can still see the graphite line drawing showing through the thin wash underpainting:

Next I did a rough "closed" underpainting -using white instead of the white of the panel. It got more refined than this but still I consider it an underpainting, thinking only in value and using a very limited palette:

Below is the first stage of the overpainting, where I am using a full spectrum of colors, and no black at all, to get a richer, more colorful range of greys. Here I am making what I think of as a "bed layer" - much more refined than the underpainting, but nowhere near the final level of detail. I'm not trying to paint to a finish, I'm just putting down whatever I think will help me in the final stages.

On to the final layers. At this point I am trying to achieve the highest level of finish possible in a very small area of the painting for every session. At a certain point I can see what I need to do to push the realism further, but I have to wait for the layer to dry before I can do more layers:

Below I am working completely in glazes, using honey-consistency glazing medium with just dark, transparent paints, and occasionally bringing a light area just a bit higher. This looks pretty similar to the previous stage, but it represents many more hours of work. This is the final push for the most impact I am capable of achieving with the paint.

Lessons learned: I did my underpainting using a mixture of mars red and ultramarine, instead of my usual raw umber and ivory black, and I regret it. My intention was to make a more colorful, warm red underpainting to sort of "glow through" the very cool overpainting colors and create a subtle vibration. But what I am finding is that the underpainting is actually very, very violet, and I am having to mix enormous amounts of yellow into all the subsequent layers of paint. (Yellow being the compliment of violet or purple, therefore they cancel each other to a neutral). 

I am also continuing to learn how discerning the human eye is, that a tiny whisper of different value or hue between two adjoining shapes makes a clearly discernible edge. I am constantly experimenting with how subtle a difference I can make that will still read as a difference, and describe form. In the shadowy areas of the wax paper we can see a lot of sculpted form and transparency within a very low value range - dark to black, with just little glimmers for highlights.

It's fun to try to emulate that effect, nudging hues and values around in tiny steps to describe the forms.


Dust as always is the bane of my existence. I've taken to turning the painting backwards to tilt downards a bit and tenting it with plastic overnight. I also tent my entire brush and palette area with plastic overnight. I never wear sweaters or wool in the studio, and I never tear paper towels or cut cloth rags inside the studio. All of that has helped, but I still spend a period of every painting session cleaning my surface.

PS: I've made a post about all my mediums, paints and brushes, you can always find it in the materials link in the right column under Labels.

Tuesday
May122009

Bottle Collection: Overpainting II

detail in progress

It's always satisfying to bring at least a small area of the painting up to the highest degree of finish I can manage. Here are previous stages of this area of the larger painting:


I'm pretty happy with it at this stage, although for several painting sessions I was really struggling over the brightest areas of wax paper in front. It's always hardest for me to figure out how to paint an area with lots of bright highlights.


I've been thinking about highlights and why they are so difficult. They are not, as we are sometimes taught, simply the lightest areas. In fact, in order to paint convincing highlights, I find I have to paint the entire form without the highlights first. Highlights behave in a completely different way than the rest of the light. 

I think understand why: unlike other light effects, the highlights are reflections the way a mirror is a reflection. So light is not merely bouncing off the surface, but there is a depth to the highlight. It's actually hitting a different plane of vision, so we actually re-focus our eyes to see a highlight. 

Which is why it is so hard to paint highlights: we are trying to capture a stereoscopic effect. Our eyes can perceive depth in real life, but a painting is merely the illusion of depth. 

Sunday
Apr122009

Bottle Collection: Overpainting


Finally getting to a high level of finish in one corner of the painting. Here are the previous stages of this area (it's about a 5 x 6 inch corner of a larger 18 x 24 inch painting):

detail, underpainting stage 2

detail, underpainting stage 1

I was taught to paint first the background, second the ground plane, third the shadow side of objects, and finally the light side, in that order. But I find that tackling a painting is sort of a psychological game, and I get bored and frustrated working on the background and ground plane for days before I get to the "good parts".

So I've developed my own method. I have found that I need to bring an exciting/challenging area up to the highest finish I can. That sort of sets the standard for the rest of the painting, and I have to bring everything else up to the same standard. It keeps me excited to work every day and makes it all seem like a fun challenge, and less like an impossible acreage to cover with my tiny brush.

I think every painter must have to develop their own way to approach a painting to stay engaged and motivated, and to avoid over thinking, or avoid just giving up out of frustration or intimidation. It's a psychological dilemma to solve every day in the studio.

I'd love to hear how you solve this. Or, if you are not a painter, how you keep yourself energized and excited for any challenging project? Do you do the fun parts first and crank out the boring bits at the end? Or do you save the best for last? Do you tackle the hardest things right away, or warm up with more manageable steps?

Monday
Mar302009

Bottle Collection: Underpainting II

detail in progress

detail, previous stage

18 x 24, underpainting, work in progress

I've developed the underpainting for this painting more than any of my previous paintings. It's not much fun, because the results are not very satisfying. In fact, it's really ugly even after days and days of work on it! But I realized that if I spend more time on this stage, getting the basic values of each area very settled, the later stages go much faster.

Monday
Mar302009

My materials - paint, mediums, gesso, brushes


I've been getting some questions about what materials I use, so I thought I'd write a post about it so all my answers are in one place.

Brushes
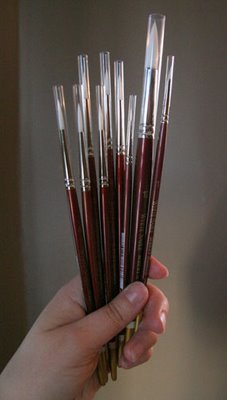
I love love love Robert Simmons brushes. They are amazingly good quality and amazingly cheap. They are so cheap that when a brush loses it's springiness or it frays, I just toss it and grab a new brush. I use the 785 series white sable round, mostly sizes 4, 1, and 8/0. I also make my own smaller brush with an x-acto knife, by trimming off half the hairs of an 8/0 size brush.

Paints
Use good quality brands. Cheap oil paints are just less pigment and more oil, so you use more anyway. A tube of cheap paint actually feels lighter in the hand than the same color tube of a higher quality paint! I like Sennelier brand. I've never used Old Holland but I've heard those are the best and plan to try them out as I need to replace my tubes. I was taught by Kirstine Reiner to grind my own paints, which is really the best way to paint, and not as difficult as it might seem. I'm starting to be annoyed by the "graniness" of prepackaged paints, so maybe I'll get around to mixing my own again someday.

Palette
I use a small brown wooden handheld palette. I've tried white palettes, glass palettes, and huge oversized wooden handheld palettes, but I always go back to the little brown one. And I often clamp it to the easel just below my painting so I don't have to hold it.
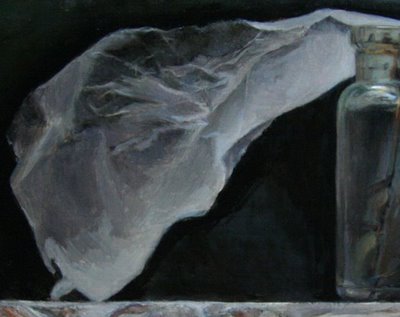
Mediums
I mix my mediums in a clear, straight-edged jar, and I make a few evenly spaced marks up the side with a small sharpie for measuring by "parts".

Underpainting medium (for thin, transparent layers)
2 parts linseed oil
1 part turp

Painting medium (for heavier oil, later layers)
1 part linseed oil
1 part stand oil

Panels
Art Board

Gesso
I mix my own, but it's a big project, so for smaller/faster paintings I use a Art Board brand gesso.

Brush cleaner
Turpenoid Natural in the green can is great for cleaning brushes, I swish my brushes in it to clean them in a "Silicoil" jar. I like that it leaves the bristles pliable and conditioned and never dries them. I don't use Turpenoid Natural in my paints or mediums though, it seems to dry sticky and I'd be afraid of what that would do to a finished painting over time.
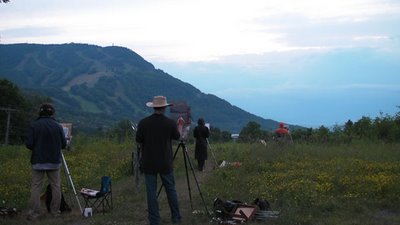
Thursday
Mar262009

Wrapped Pitcher: FINAL - SOLD

6 x 8 inches, oil on panel (SOLD)

It was really nice to focus on a small painting! Had a lot of fun with this, did it in about 8 half-day sessions in under 2 weeks. I didn't include a shot of every day of work... the last few days the changes are important, but are barely visible in a photograph.

Here are the stages:

Underpainting
Transparent paint, no white, pencil drawing still visible.

Opaque painting stage 1
Blocked in the major values with opaque paint -still thin, using underpainting medium.

Overpainting stage 2
The whole panel has at least one layer of overpainting, and I'm starting to refine the details in the upper right edge of wax paper. Using real medium now.


Overpainting stage 3
I decided all my shadows within the wax paper were too dark, so I lightened all the wax paper.

Final

Went back into the wax paper and refined all the details. I wanted to get an accurately wide spread of values within the wax paper but also show that the overall range of values in the wax paper is very light. Finding the steps between the brightest highlights and the next step down is always the hardest. Making the darks distinct from the lights, but not too dark, is always hard, too.

This painting and all others listed under "available work" are for sale. Please email me for a price list.

If you haven't yet, come on over and check out my new blog, Women Painting Women, it's a great collection of 59 amazing artists and counting!

Thursday
Mar192009

Bottle Collection: Underpainting I

18 x 24 inches, oil on panel
see the previous post about this painting

Before I began the underpainting I applied a thin layer of varnish to preserve the drawing but mostly to seal the thirsty, absorbent gesso ground. Wow, what a difference! Its is such a nicer surface to paint on, grabby but not too thirsty, silky but not too powdery. It made painting this layer much faster than usual.

A reader asked me recently what I use for the underpainting. My process always evolves, but today I used Mars Red, Ultramarine Blue, and a little touch of Titanium white. I used the palette knife first to mix up a nice batch of this combination, mixing in my underpainting medium (2p linseed, 1p turp) so I had a nice big puddle of paint on my palette with the correct consistency.

I tend to be against pre-mixing and I usually just dip my brush in whatever I need as I paint, and but it felt like a luxury to paint with a generous puddle and saved a lot of time, so I'll probably keep doing it.

A note about materials and process: I am not a precise, materials, craft-obsessed painter. I tend to hate recipes and I get impatient with complicated preparation. However, I am finding a strange thing happening. As I get more refined in my painting I am more sensitive to materials and I am getting more and more interested in craft. I'm not generally drawn to craft for craft's sake but good materials made of simple, high quality ingredients, prepared carefully, make a huge difference for painting.

I think it's possible to get distracted by materials and craft though, so the needs of the painting should drive the investigation of materials. Craftsmanship and materials should save time and make painting more enjoyable, not the reverse.

Thursday
Mar192009

Wrapped Pitcher: Underpainting 2

6 x 8 inches, oil on panel

This is the "second under painting" layer, called a closed grisaille. I'm still working monochromatically, as with the previous layer of transparent underpainting, but I'm using opaque paint, meaning the light areas are white paint, not just rubbed through to the light panel ground.

I'm trying to set up a base layer that will help me when I am working on smaller details in the final stages. I want each large area to already have a defined value range, so I don't make the darks too dark and or the lights too light within a given area.

I'm also avoiding painting the lightest lights or darkest darks at this point because I want to reserve the option to punch a dark back,or pop a light out from this range of midtones.

Once this layer is dry I think I'm ready to move on to the fun part, the actual painting.

Tuesday
Mar172009

Wrapped Pitcher: Underpainting

6 x 8 inches oil on panel

It's probably hard to see what the subject is at this early stage of under painting messiness, but it's my favorite little pewter pitcher wrapped up in wax paper.

I'm trying an experiment, so see if I can work on a series of small paintings while I also work on a large painting. My plan is to work most the day on the Big Painting, but reserve an hour or two to work on the smaller project, hopefully one that I can finish in a week.

I'm usually completely focused on one painting at a time, which I like because I go to bed thinking about it and wake up knowing what I'm going to start in the studio instead of dithering about What To Do. But at my current rate of output it will take me forever to get to my goal of 30 portfolio-standard pieces. So I'm hoping I can speed up and start cranking out more than one painting every month or two.

On another note, I've started a new blog devoted to contemporary Women Painting Women. If you have any suggestions for work to include there please email me! sadiej[at]gmail.com

Wednesday
Mar042009

Oil Studies: Onion, Plum, and Cup

White Sprouted Onion SOLD
oil on panel
5 x 7 inches

I decided to try something I haven't done in a while: a small, fast painting! I enjoyed it so much I did a couple more.

Silver Cup
oil on panel
6 x 6 inches

Plum SOLD
oil on panel
5 x 7 inches

All three of these are for sale for $150 each plus shipping. The first person to email me with the one they want gets it.

Tuesday
Mar032009

Antique Bottle: FINAL

Antique Bottle with Wax Paper SOLD
8 x 10 inches
oil on panel

Contour drawing, pencil on panel

Underpainting
Transparent raw umber and ivory black, using the white of the panel for light areas

Overpainting Stage I


Friday
Feb272009

Antique Bottle: Sessions 5 & 6


Had fun spending most the day on the front edge of the shelf, all the chipped paint and knots and scratches were so satisfying to paint, and so much faster than the wax paper. Now everything is done except for a couple more sessions on the wax paper.

See the previous post about this painting here

Wednesday
Feb252009

Antique Bottle: Sessions 4 & 5

oil on panel, detail, full size: 8 x 10 inches

(earlier stage)


I've spent two more sessions on my small still life painting. This detail shows the second opaque layer on one wing of the wax paper. I'll do at least one more layer to refine it - that's 4 passes including the underpainting.

My goal is to capture that "vibration" feeling, that makes the viewer feel like they are really seeing my subject (meaning *I* have truly seen and recorded my subject). Not quite there yet.

I'm finding working smaller is not at all faster than working large - people lean in closer to a small painting, so I think the "vibration" feeling will require an even higher level of finish.

As usual, I'm not painting up to the lightest lights yet, I've found it works best to nearly finish the whole thing and go in at the very end with pure white highlights.

As I think most painters will relate, there is always the temptation to pop in the highlights early on. But I find it skews my perception of the value range, and I end up shifting everything too light if I don't intentionally stay a few steps darker than the highlights for most the painting process.

Have you ever had that feeling that you wish there was a brighter tube of paint than white? When you are sure there is only pure, uncontaminated white paint on your brush, but it doesn't look like a highlight when you put it on the canvas? You wash your brush thoroughly and try again, and it's still doesn't "pop"? I hate that, it's the sign of a painting that has lost its value range. May as well wipe down and start over!

Anyway, I'm hoping to finish this one soon, there's a nice row of still lifes lined up on my shelf ready to be painted...

Previous post about this painting is here

UPDATE: I got a question about what my painting medium is, here are the recipes I use:

Underpainting:
2 parts refined linseed oil
1 part rectified turpentine

Overpainting:
1 part refined linseed oil
1 part stand oil

Page 1 ... 2 3 4 5 6 ... 11 Next 20 Entries »